Running Cilium as a BYO (bring‑your‑own CNI on AKS (Azure Kubernetes Service) is now a first‑class, supported pattern for advanced users who want full control over the dataplane. In this post I’ll go step by step through creating an AKS cluster with no built‑in CNI and then installing Cilium on top.
For most workloads, these are enough, but they limit how deeply you can tune or extend the networking dataplane. What’s more, there are yet two other options:
Bring your own (BYO) CLI,
Azure CNI Powered by Cilium.
Why BYO CNI and Cilium?
BYO CNI lets you create an AKS cluster with –network-plugin none, so no CNI is preinstalled and you can bring your own plugin such as Cilium. Microsoft explicitly calls this out as the recommended option for customers who need more control and want to use Cilium‑specific features beyond what managed Azure CNI powered by Cilium exposes. And that’s the way we gonna deploy our AKS Cluster in a minute.
AKS Cluster Deployment
Pre-steps
First make sure you’re logged in and targeting the right subscription:
					az login

az account set --subscription "<your-subscription-id>"

az account show
Create a resource group for the lab. This RG will contain both the AKS control plane object and the underlying node resource group that AKS creates automatically.
					az group create \
  --name rg-aks-cilium-demo \
  --location germanywestcentral
Create an AKS Cluster with no CNI
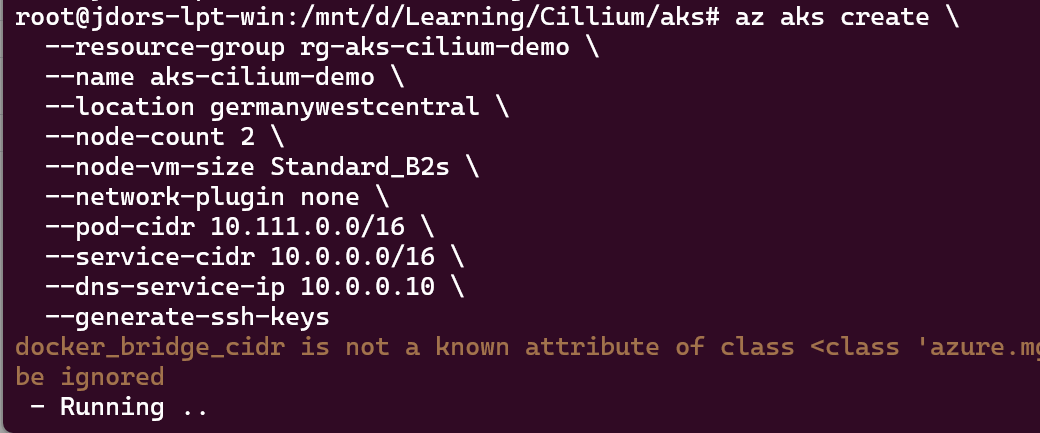
Now we create the AKS cluster in BYO CNI mode by setting --network-plugin none:
the pod cidr is required (even if we plan to use Cilium)
service-cidr and dns-service-ip are required. The dns-service-ip must be assigned from the service-cidr IP range. It’s recommened not to use the “first” IP,
the crucial one: network-plugin is set to none. It means that Azure will not install the CNI.
AKS Cluster creation
You can monitor provisioning with:
					az aks show \
  --resource-group rg-aks-cilium-demo \
  --name aks-cilium-demo \
  --query "provisioningState" \
  --output table
or:
watch -n 10 'az aks show --resource-group rg-aks-cilium-demo --name aks-cilium-demo --query "{State:provisioningState, Nodes:agentPoolProfiles[0].count}" -o table'
Monitoring AKS Cluster creation
This makes it easy to see when the cluster is fully created and how many nodes are in the agent pool.
Monitoring AKS Cluster creation - succeeded
AKS Cluster in Azure Portal
Connect to the Cluster
At this stage, the cluster will exist but the nodes will typically be reported as NotReady because no CNI plugin has initialized the pod network yet.
First, let’s connect to the Cluster:
					az aks get-credentials \
  --resource-group rg-aks-cilium-demo \
  --name aks-cilium-demo \
  --overwrite-existing
Connect to AKS Cluster
Note: az aks get-credentials merges the cluster config into your default ~/.kube/config file. Use --overwrite-existing if you’re switching between multiple clusters to avoid context conflicts.
You can check the state of the Nodes with:
kubectl get nodes
AKS Cluster Nodes "NotReady"
You can confirm the reason why nodes aren’t ready with:
kubectl describe node <node-name>
Nodes aren't ready because of CNI error
Cilium Deployment
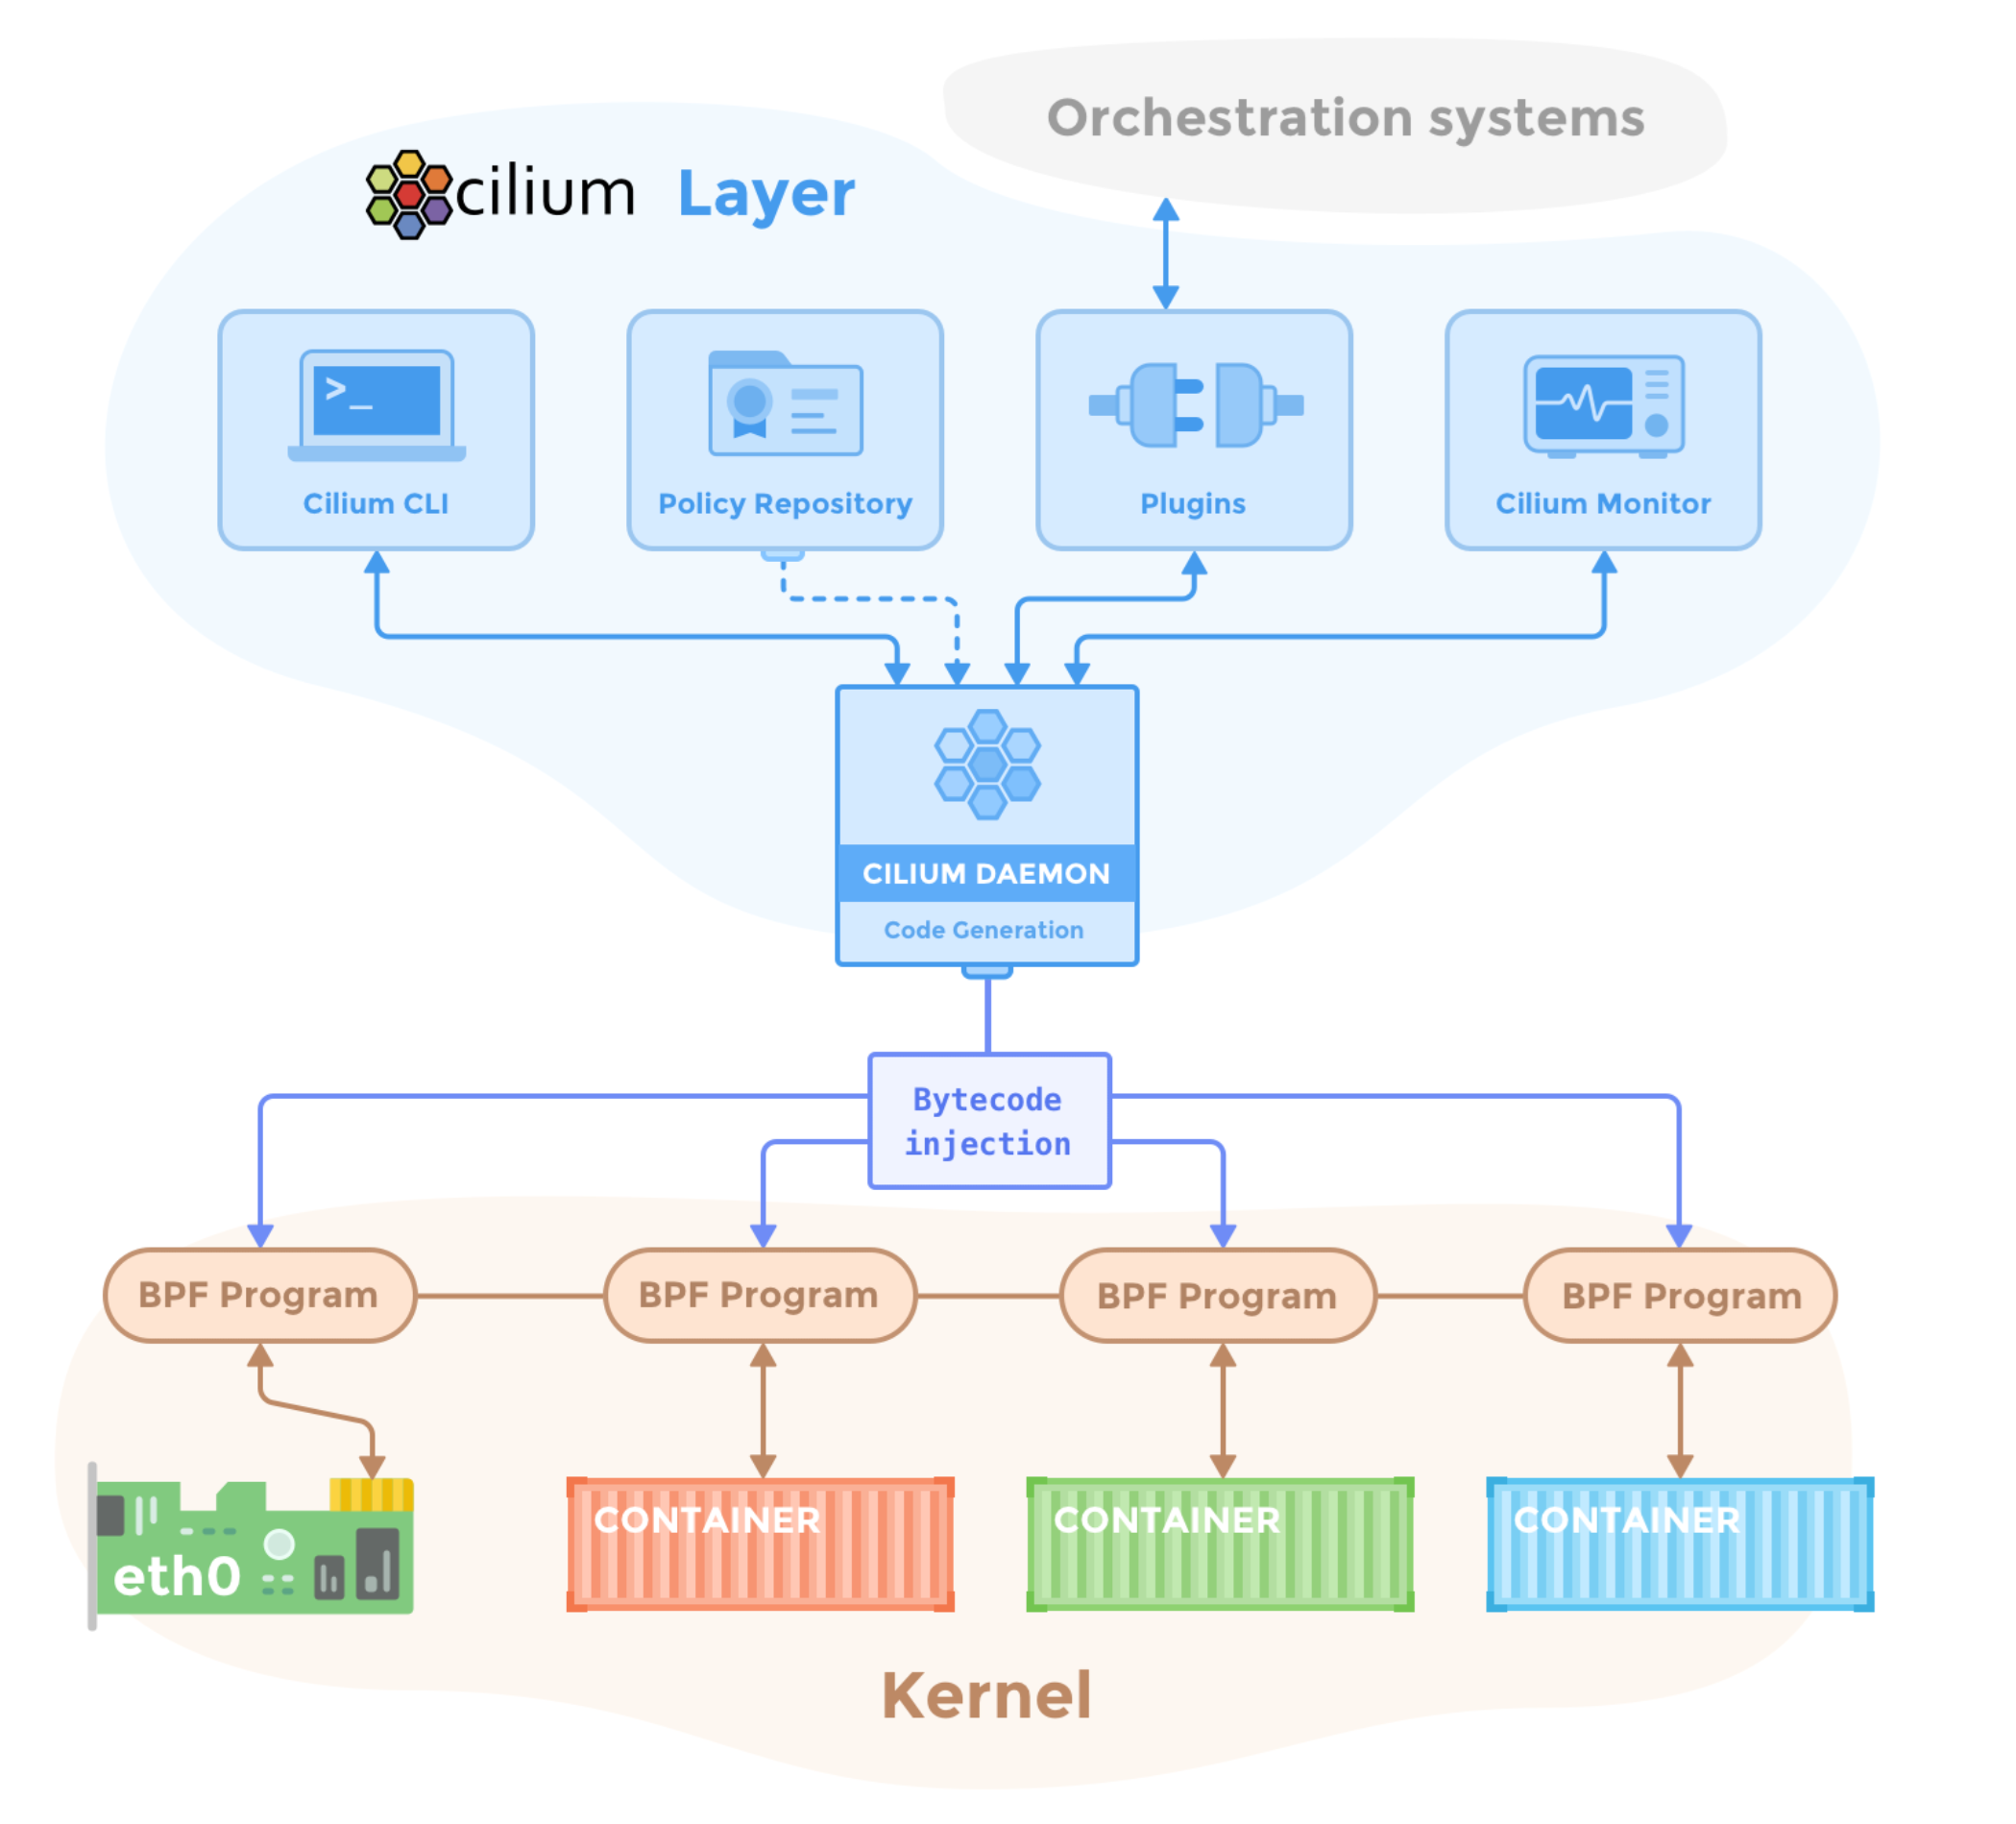
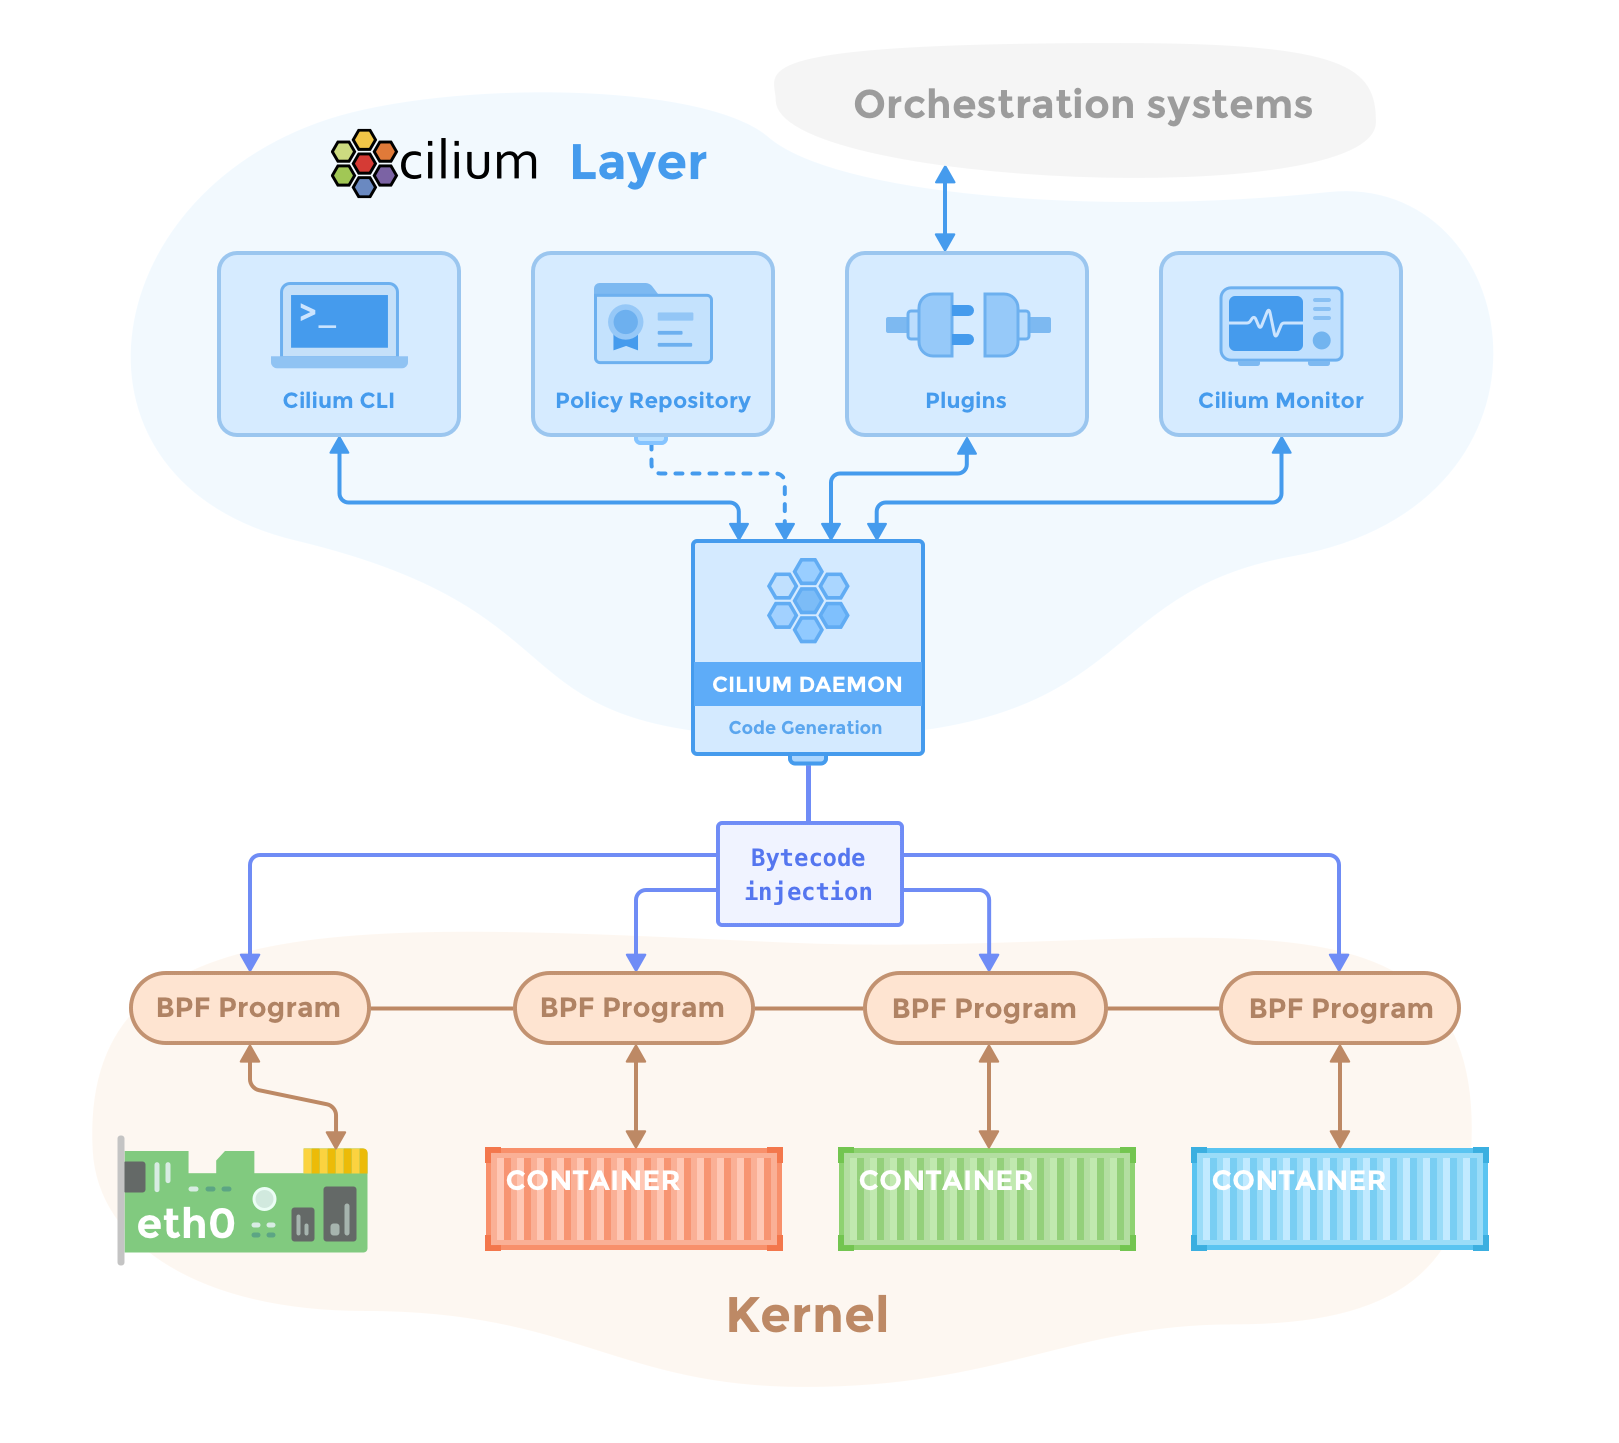
Cilium runs an agent (cilium-agent) on every node as a DaemonSet and programs eBPF hooks in the Linux kernel dataplane to handle pod networking, load‑balancing and policy enforcement. It also deploys the Cilium operator and, optionally, Hubble components for observability, which together manage IP allocation, node life cycle and flow visibility. Diagram can be found here: https://docs.cilium.io/en/stable/_images/cilium-arch.png
Cilium components scheme
Cilium CLI
On Linux you can install the Cilium CLI directly from the official GitHub releases:
					curl -LO https://github.com/cilium/cilium-cli/releases/latest/download/cilium-linux-amd64.tar.gz

sudo tar xzvfC cilium-linux-amd64.tar.gz /usr/local/bin

rm cilium-linux-amd64.tar.gz

cilium version --client
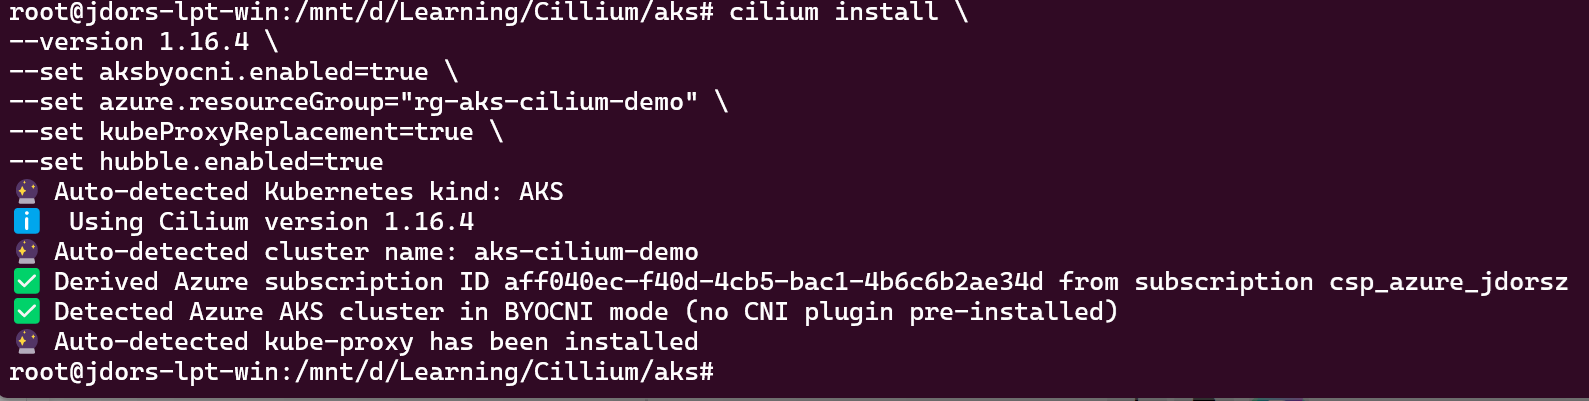
Install Cilium
It’s high time to install Cilium now. Please note that Cilium detects kube-proxy.
kubeProxyReplacement=true enables eBPF‑based replacement of kube‑proxy, so Cilium takes over Service handling and load‑balancing.
hubble.enabled=true turns on Hubble for observability, so you can inspect L3/L4/L7 flows once traffic starts flowing.
Verify the nodes are Ready and Cilium is there:
kubectl get nodes
AKS Cluster Nodes "Ready"
kubectl get pods -n kube-system -l k8s-app=cilium
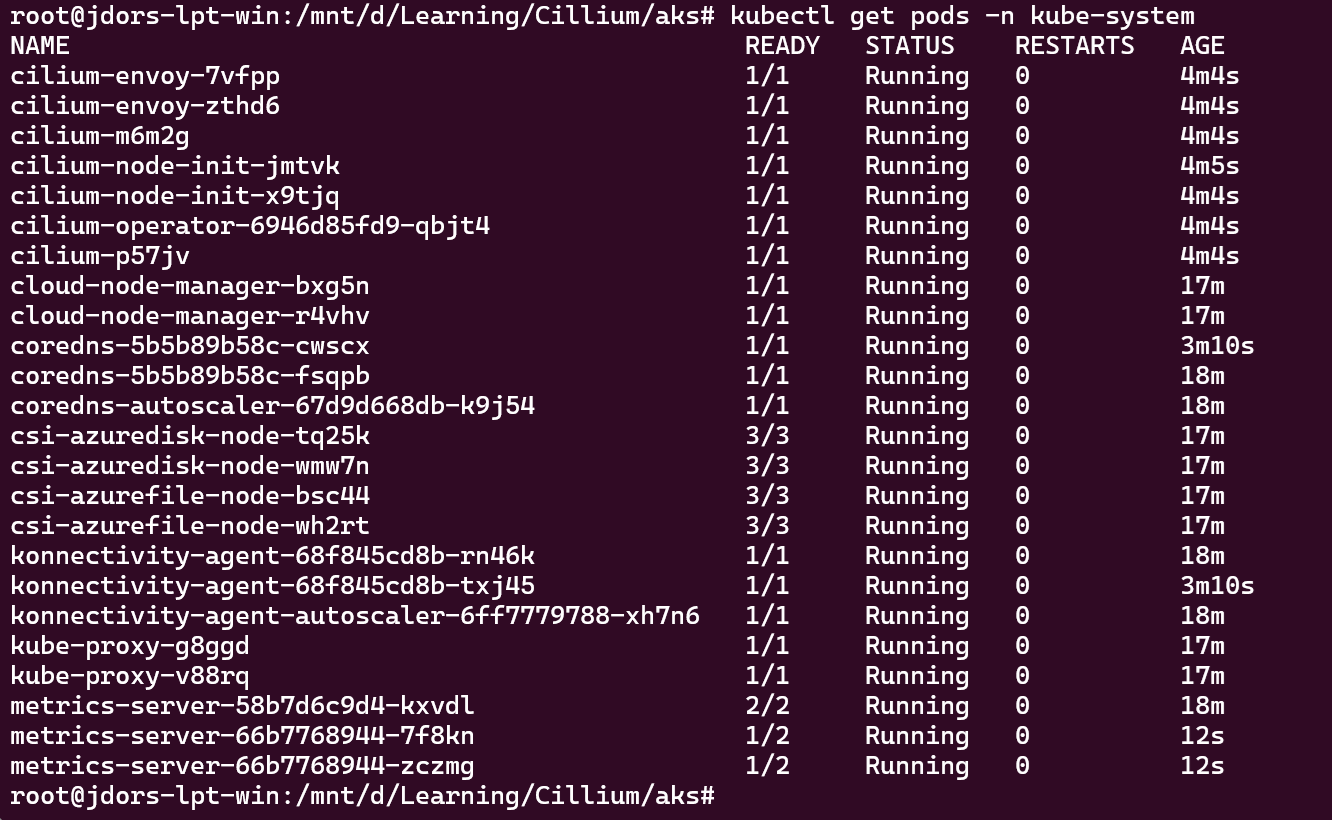
kubectl get pods -n kube-system
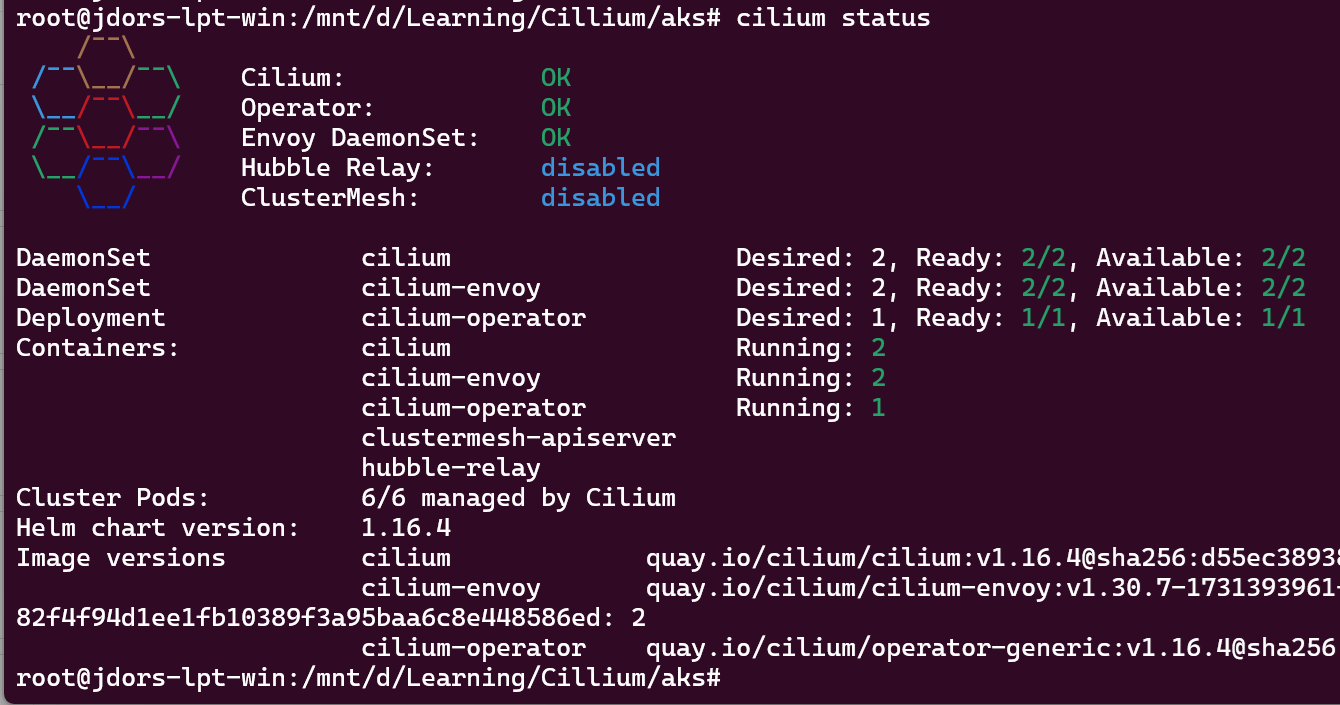
Check Cilium status:
cilium status
Cilium Status
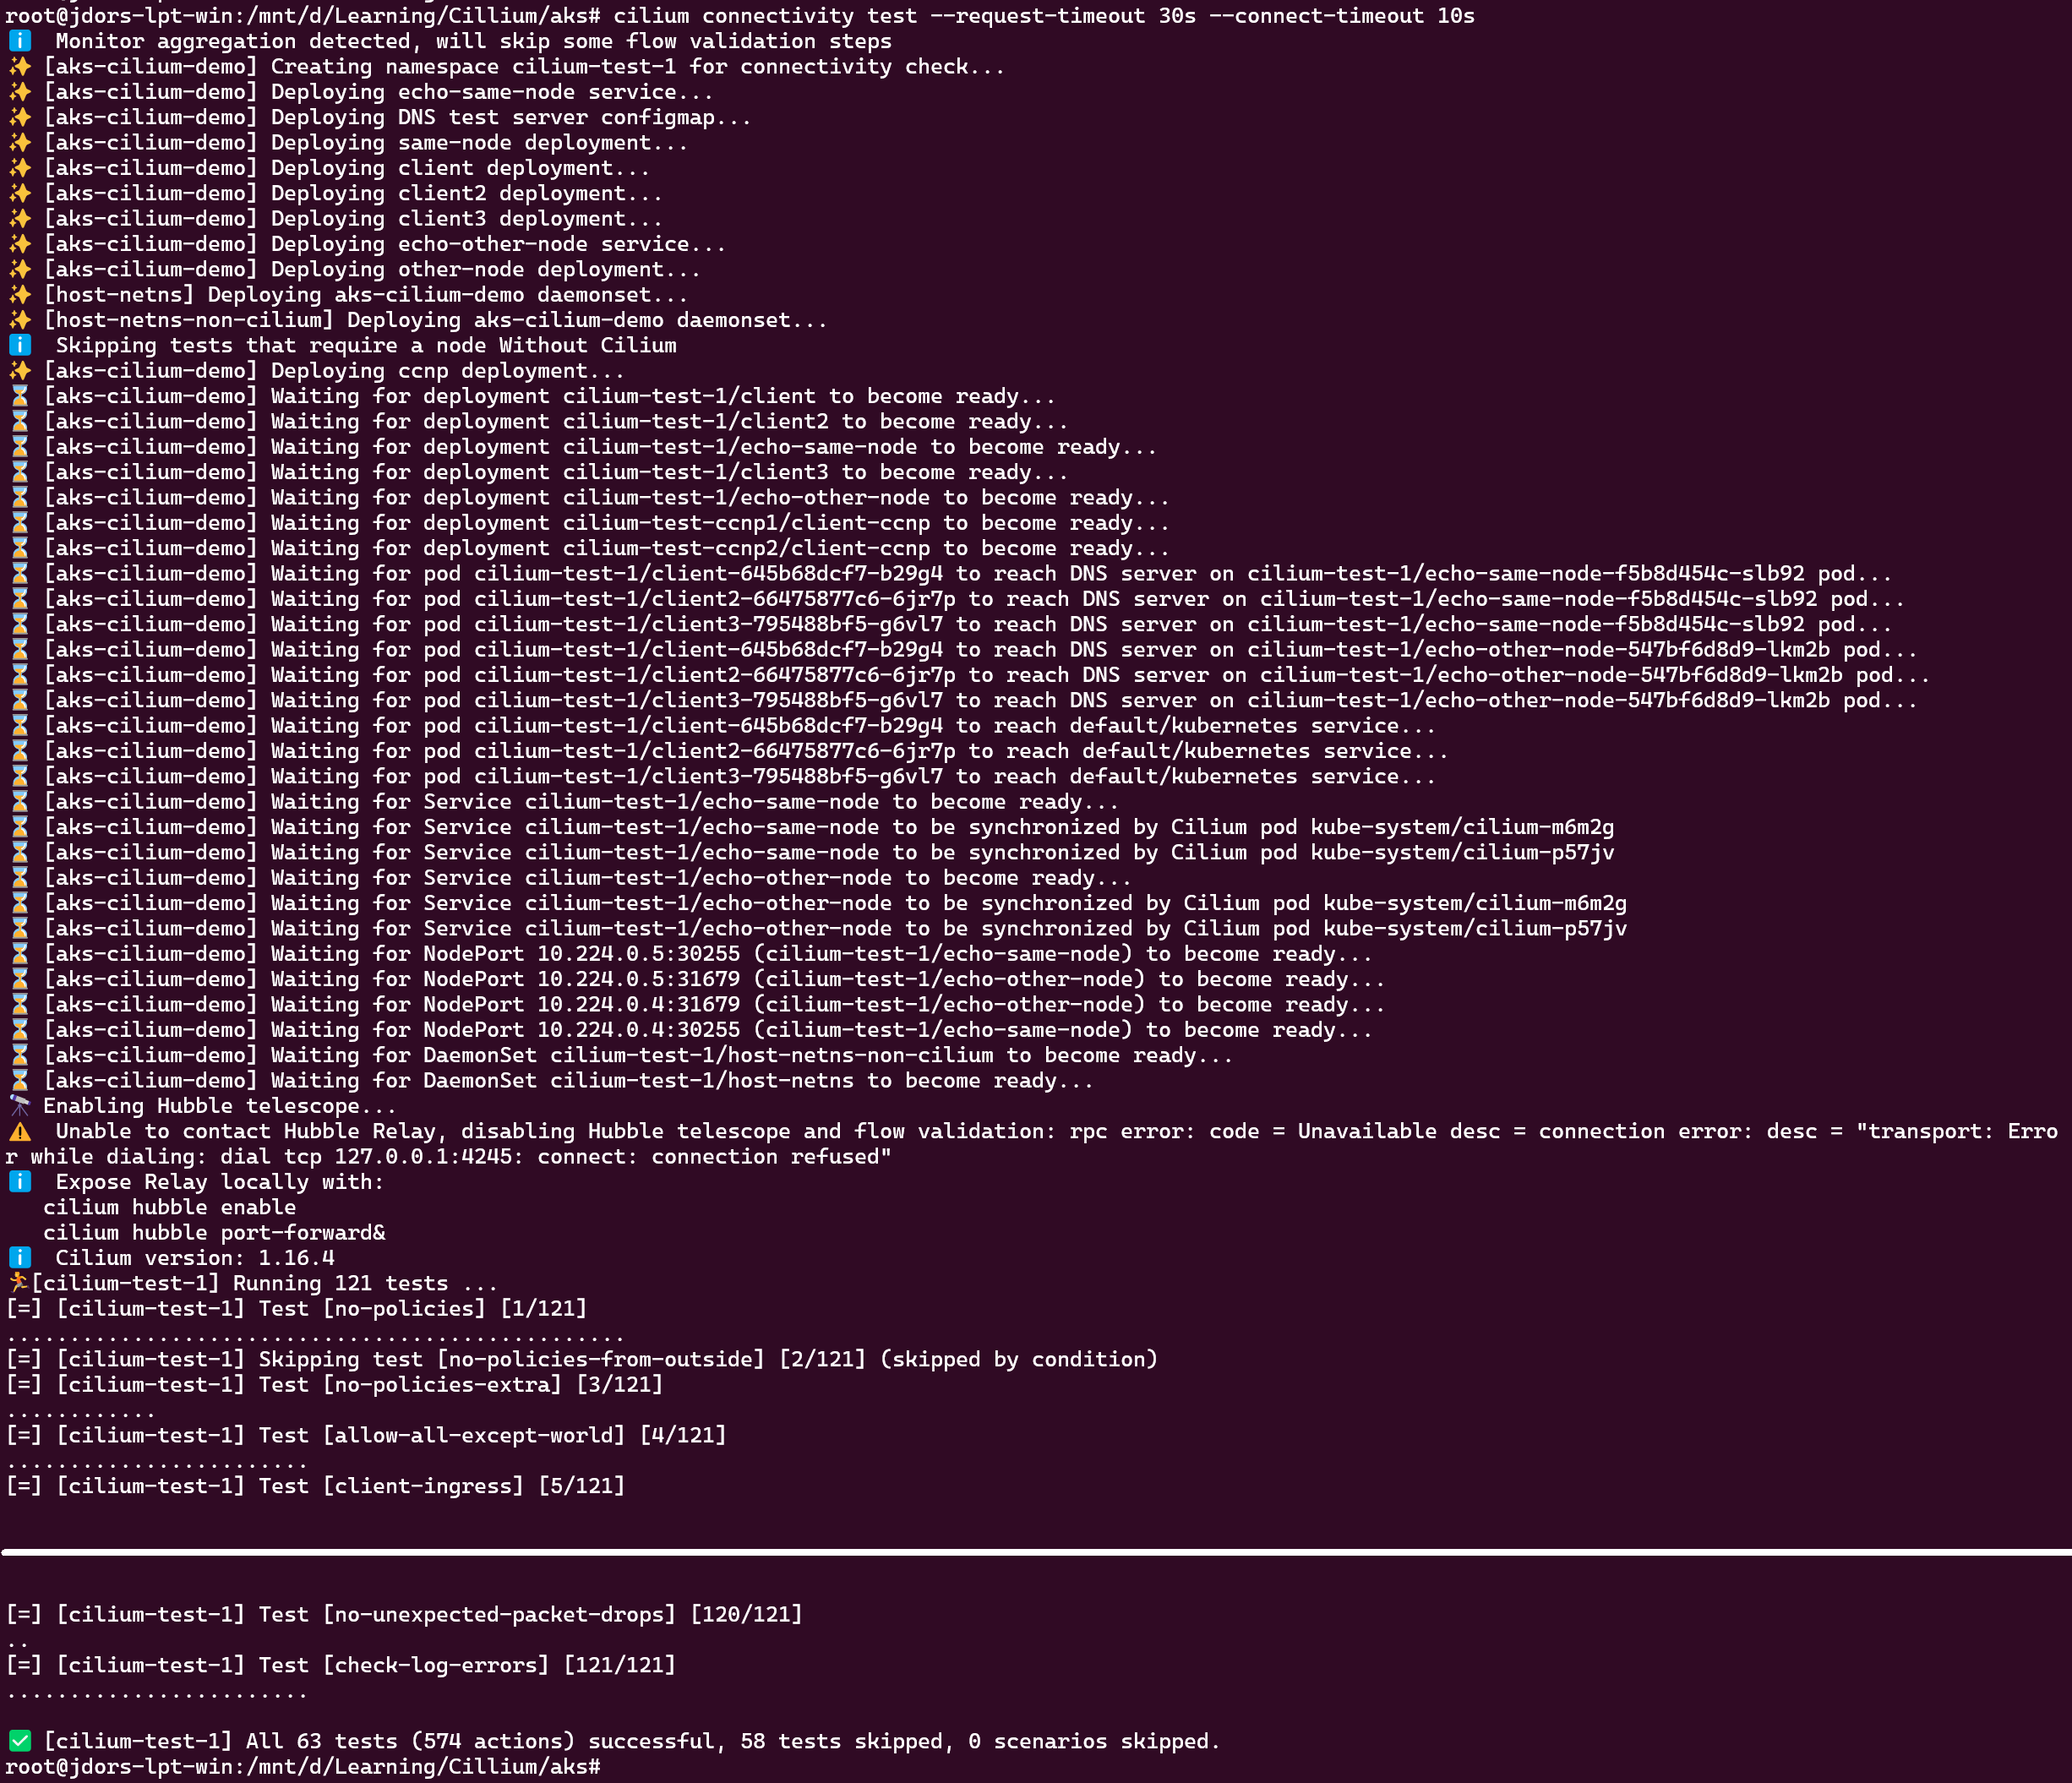
Optionally, you can validate the Cilium operation using the Cilium CLI Tool. There are plenty of tests been executed by the tool so please be veeeery patient.
cilium connectivity test --request-timeout 30s --connect-timeout 10s
Cilium CLI Tool - Connectivity Test
Cilium Test
Let’s test that the Cilium CNI is working. I’ll deploy two Pods (client and server) and check the pod-to-pod connectivity (without and with L7 network-policy).
For many workloads, Azure CNI powered by Cilium is the simplest way to get eBPF benefits with a fully managed dataplane, including performance tuning by the Azure team. However, if you want to:
Control the exact Cilium version and chart values
Enable features as soon as they land upstream (e.g. specific Gateway API, policy or observability options)
Align Cilium config between on‑prem clusters and AKS
then BYO CNI with Cilium gives you the flexibility you’re used to from on‑prem networking, while still offloading the control plane and node lifecycle to AKS.
Cleanup
You can destroy the AKS Cluster with:
					az aks delete \
  --resource-group rg-aks-cilium-demo \
  --name aks-cilium-demo \
  --yes \
  --no-wait
To destroy the resource group use:
					az group delete \
  --name rg-aks-cilium-demo \
  --yes \
  --no-wait


