
Aviatrix docs: https://docs.aviatrix.com/HowTos/SAML_Integration_Azure_AD_IdP.html
Active Directory
- Go to Azure Active Directory
- Make sure the Users and Groups are created
Application creation
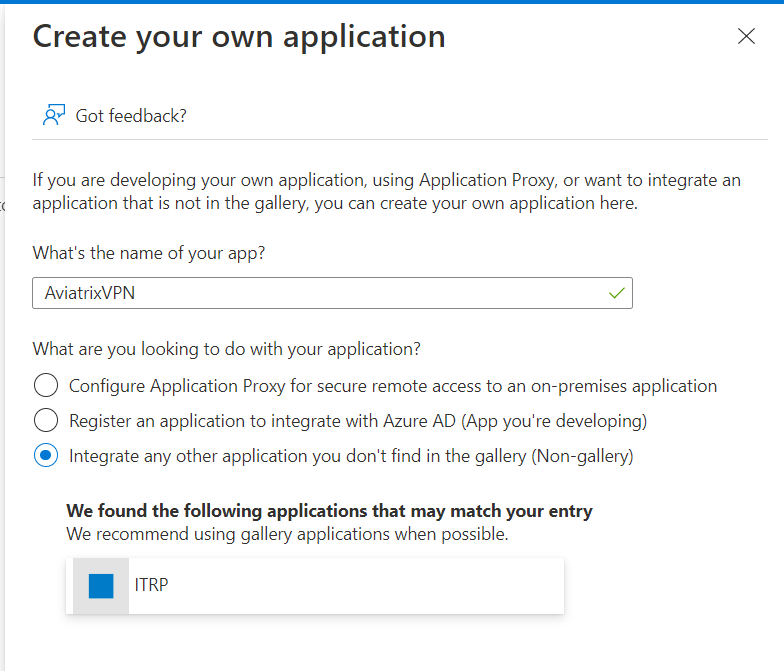
- Go to Azure Active Directory -> Enterprise Applications and select New Application


- Choose “Create your application

- Provide the name of your application and click on “Create”
- Go to the Application you created and choose “Users and Groups”. Click on “Add user/group”
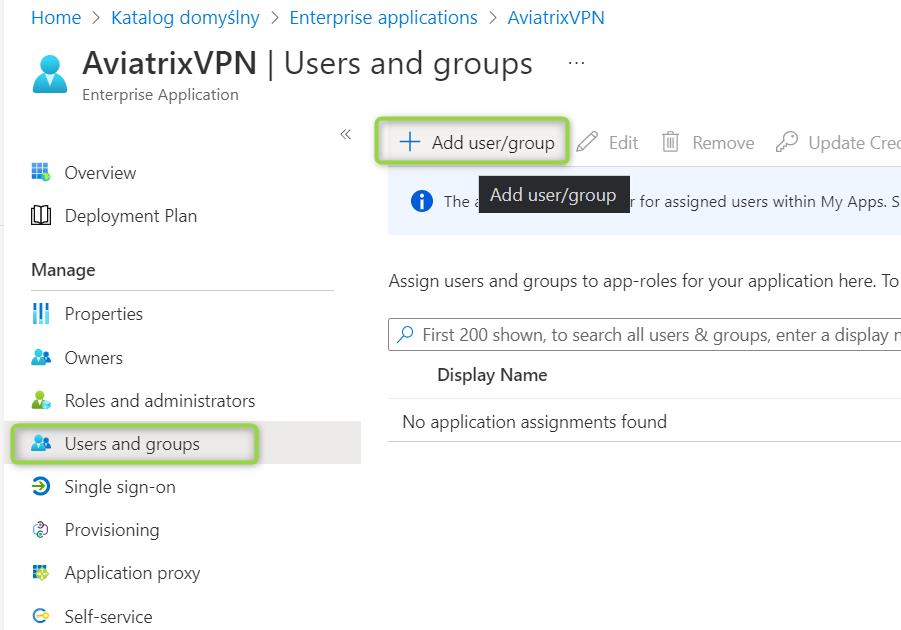
- Select the users/groups you want to be assigned
- Click on “Assign”
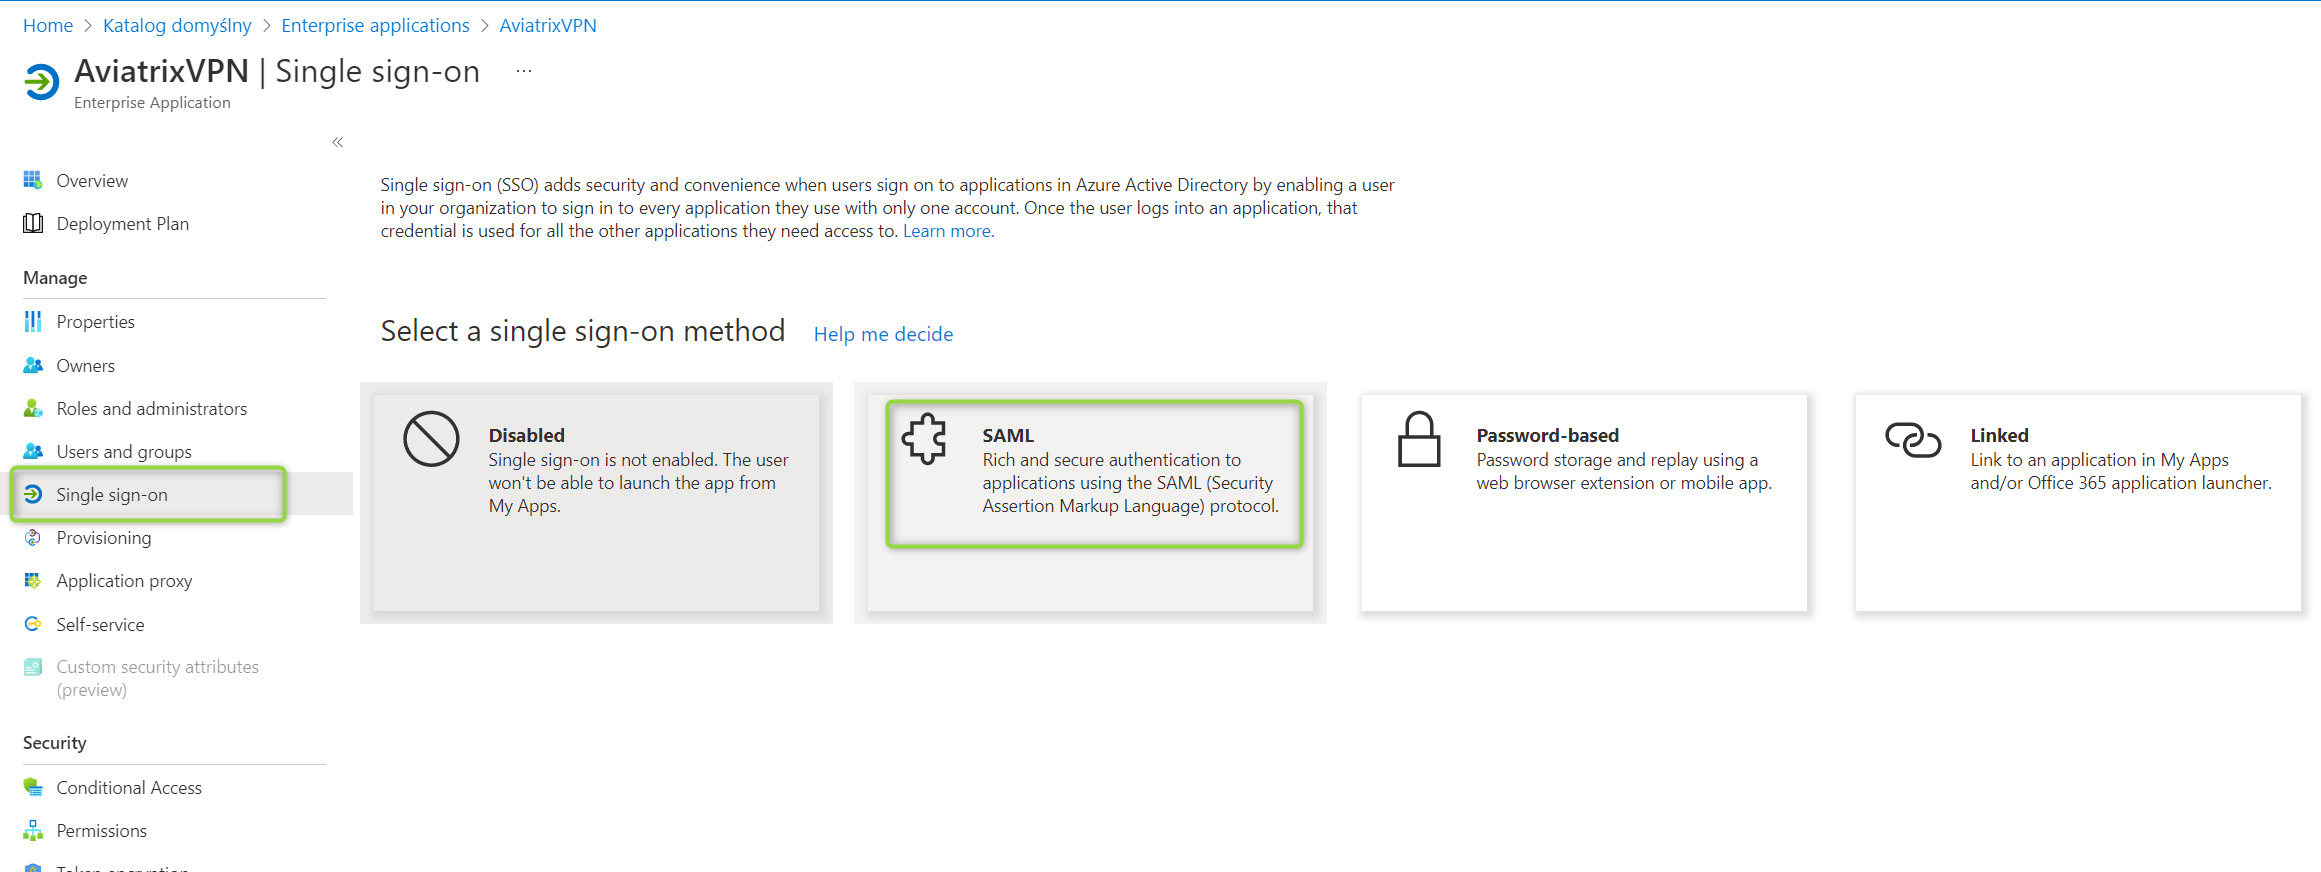
Single Sign-On Configuration
- Go to “Single sign-on” and select “SAML”
- “Edit” the field called “1 – Basic SAML Configuration”

- Fill in the following fields
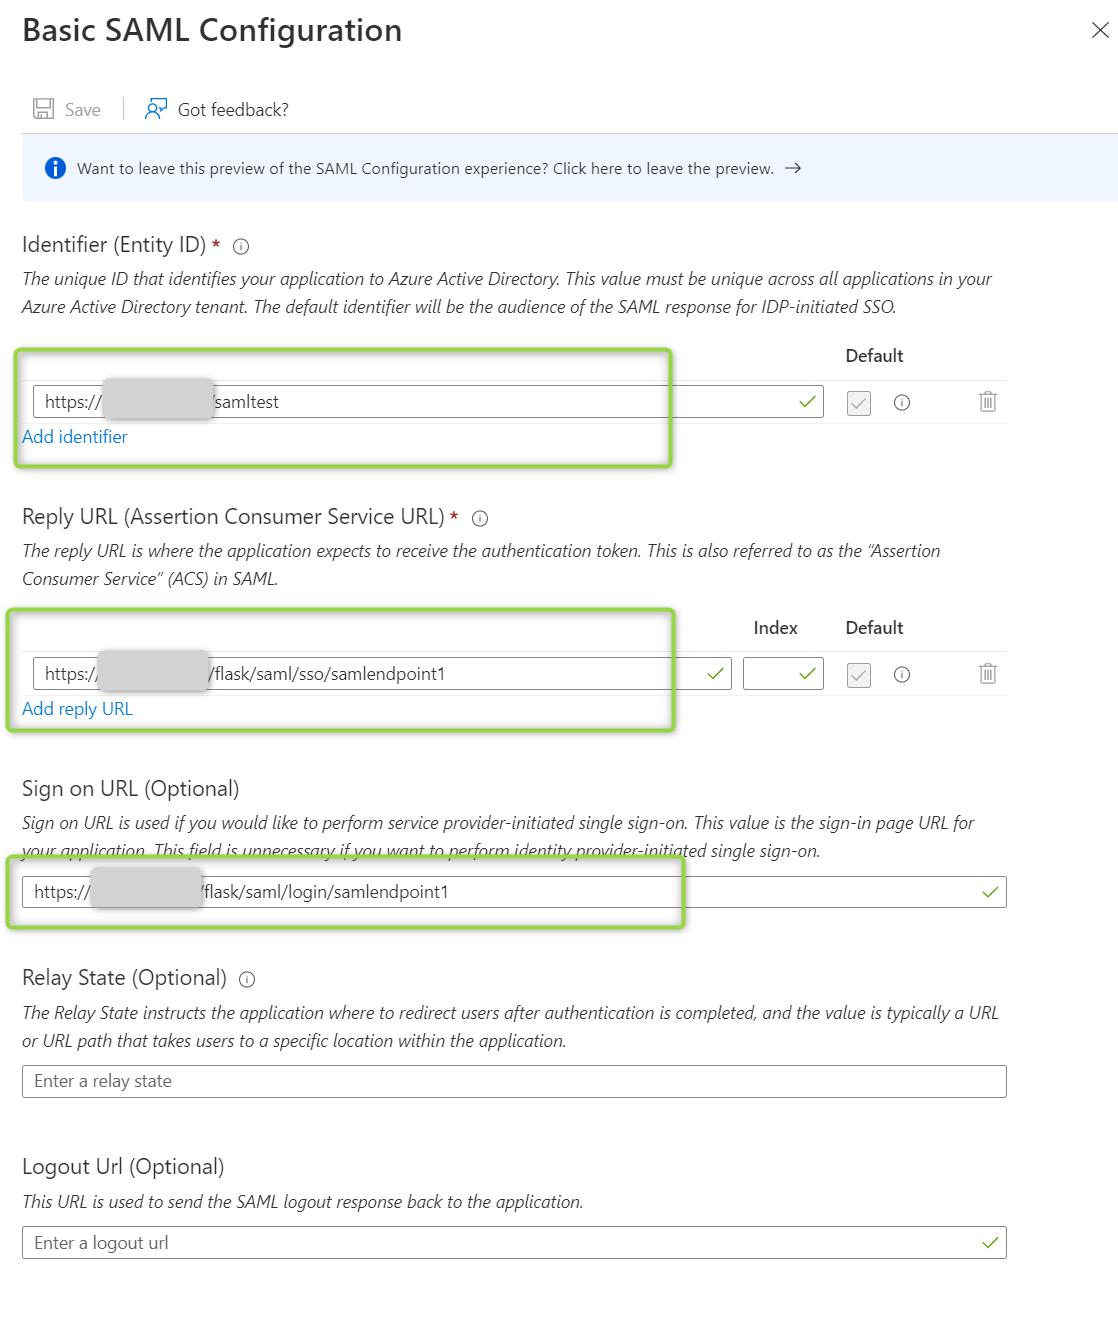
Identifier (Entity ID) – it will be your Controller IP or DNS Name of the Aviatrix Controller if you use just one Application, e.g. https://a.b.c.d (a.b.c.d is a Public IP of your Aviatrix Controller) or DNS Name, e.g. https://mycontroller.com . However, if you use multiple applications you have to put some additional string at the end (unique per application), e.g. https://a.b.c.d/app2
Reply URL – in a format of https://a.b.c.d/flask/saml/sso/<yourAviatrixEndpointName>
Sign on URL – in a format of https://a.b.c.d/flask/saml/login/<yourAviatrixEndpointName>
Please keep in mind that at this point the Aviatrix Endpoint is not created yet. Though you might specify the name of it in Azure configuration. “samlendpoint1” is the name I have chosen.
- “Edit” the field called “2 – Attributes & Claims”
The goal is to have the Users and Profile Association done by IDP = Azure AD and pass them to Aviatrix Controller as attributes. Therefore we must adjust the attributes we are going to send to Aviatrix Controller.

- Modify the claims so they look as follows (the names are case sensitive):
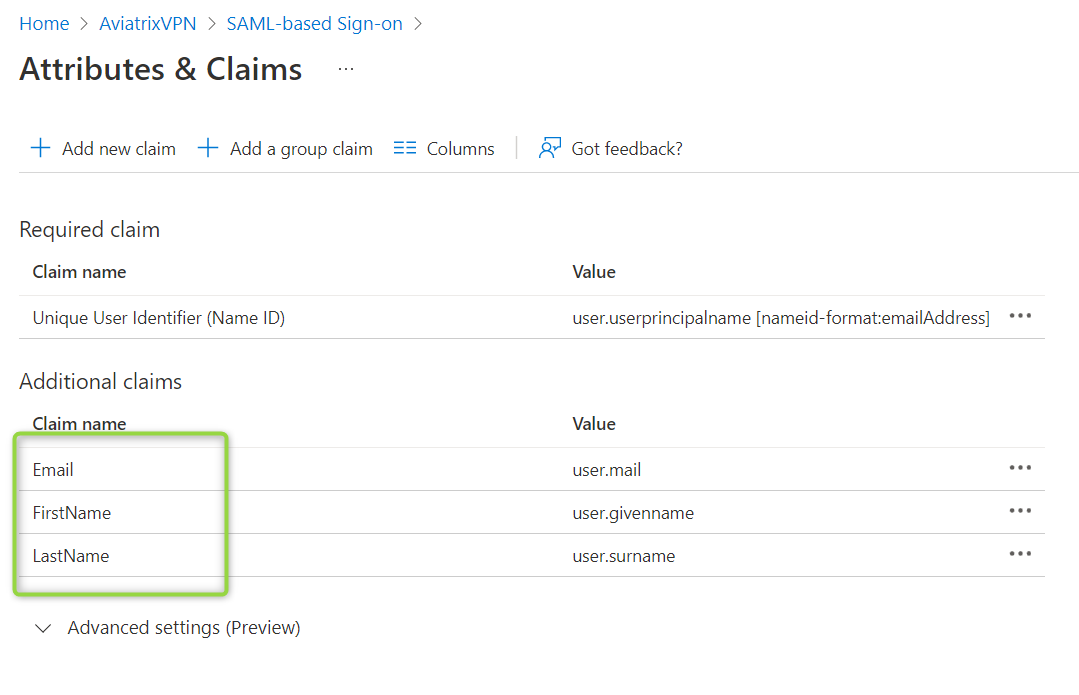
| Name | Value | Namespace |
| FirstName | user.givenname | (blank) |
| LastName | user.surname | (blank) |
| user.mail | (blank) |
Please notice that there will be one more claim (called Profile) added later.
- Log in to your Aviatrix Controller
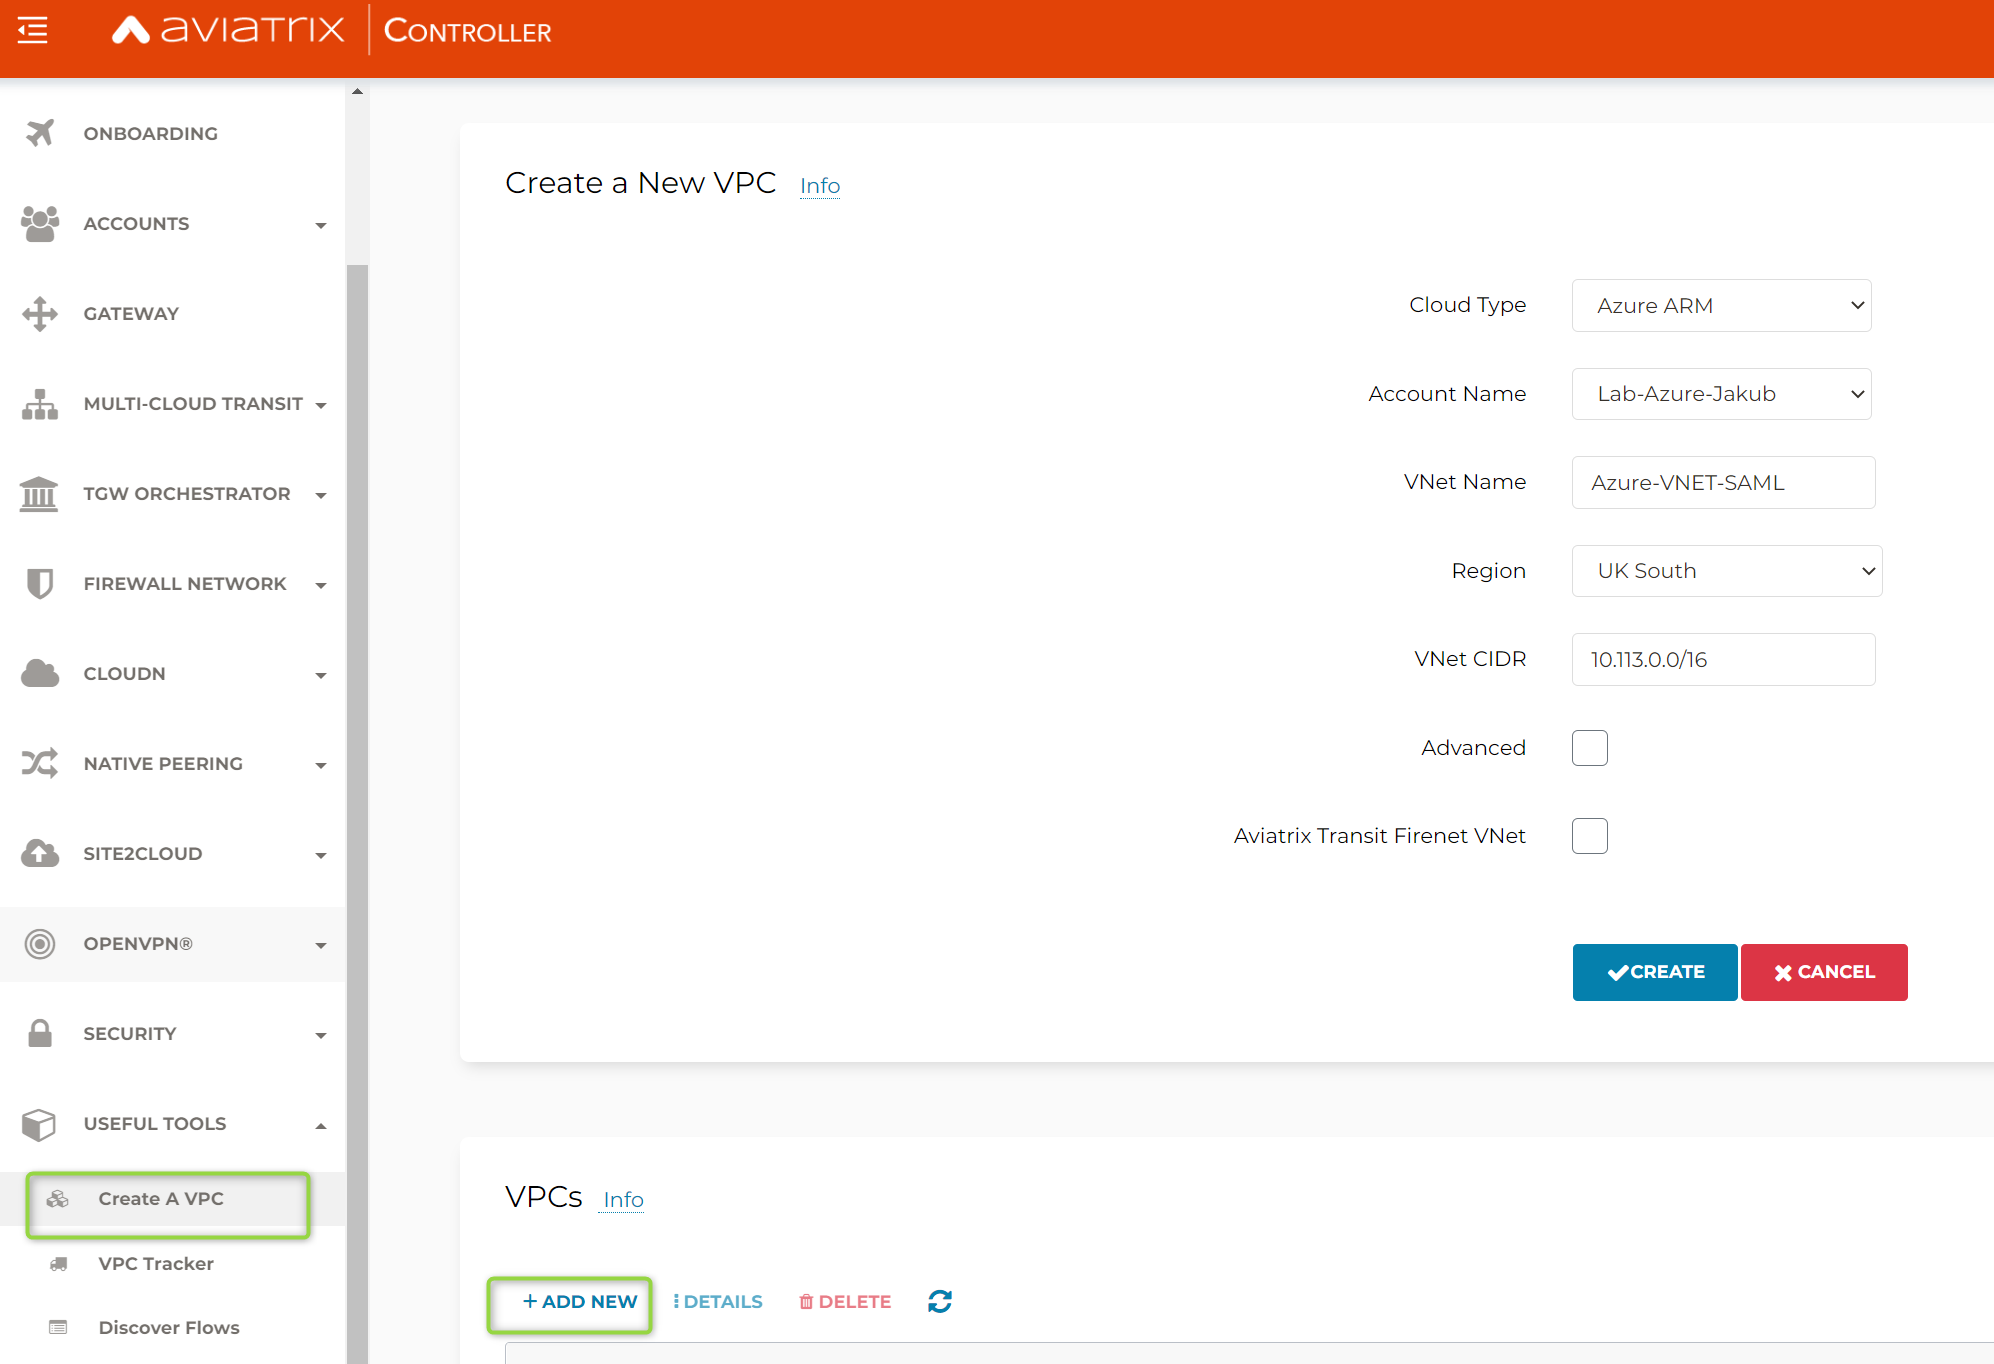
- Go to the “Gateway” section and select “Create New”

Remark: you must choose the VNET where the Aviatrix Gateway is going to be deployed. If you do not have such a VNET please go to “Useful Tools” and select “Create a VPC”.
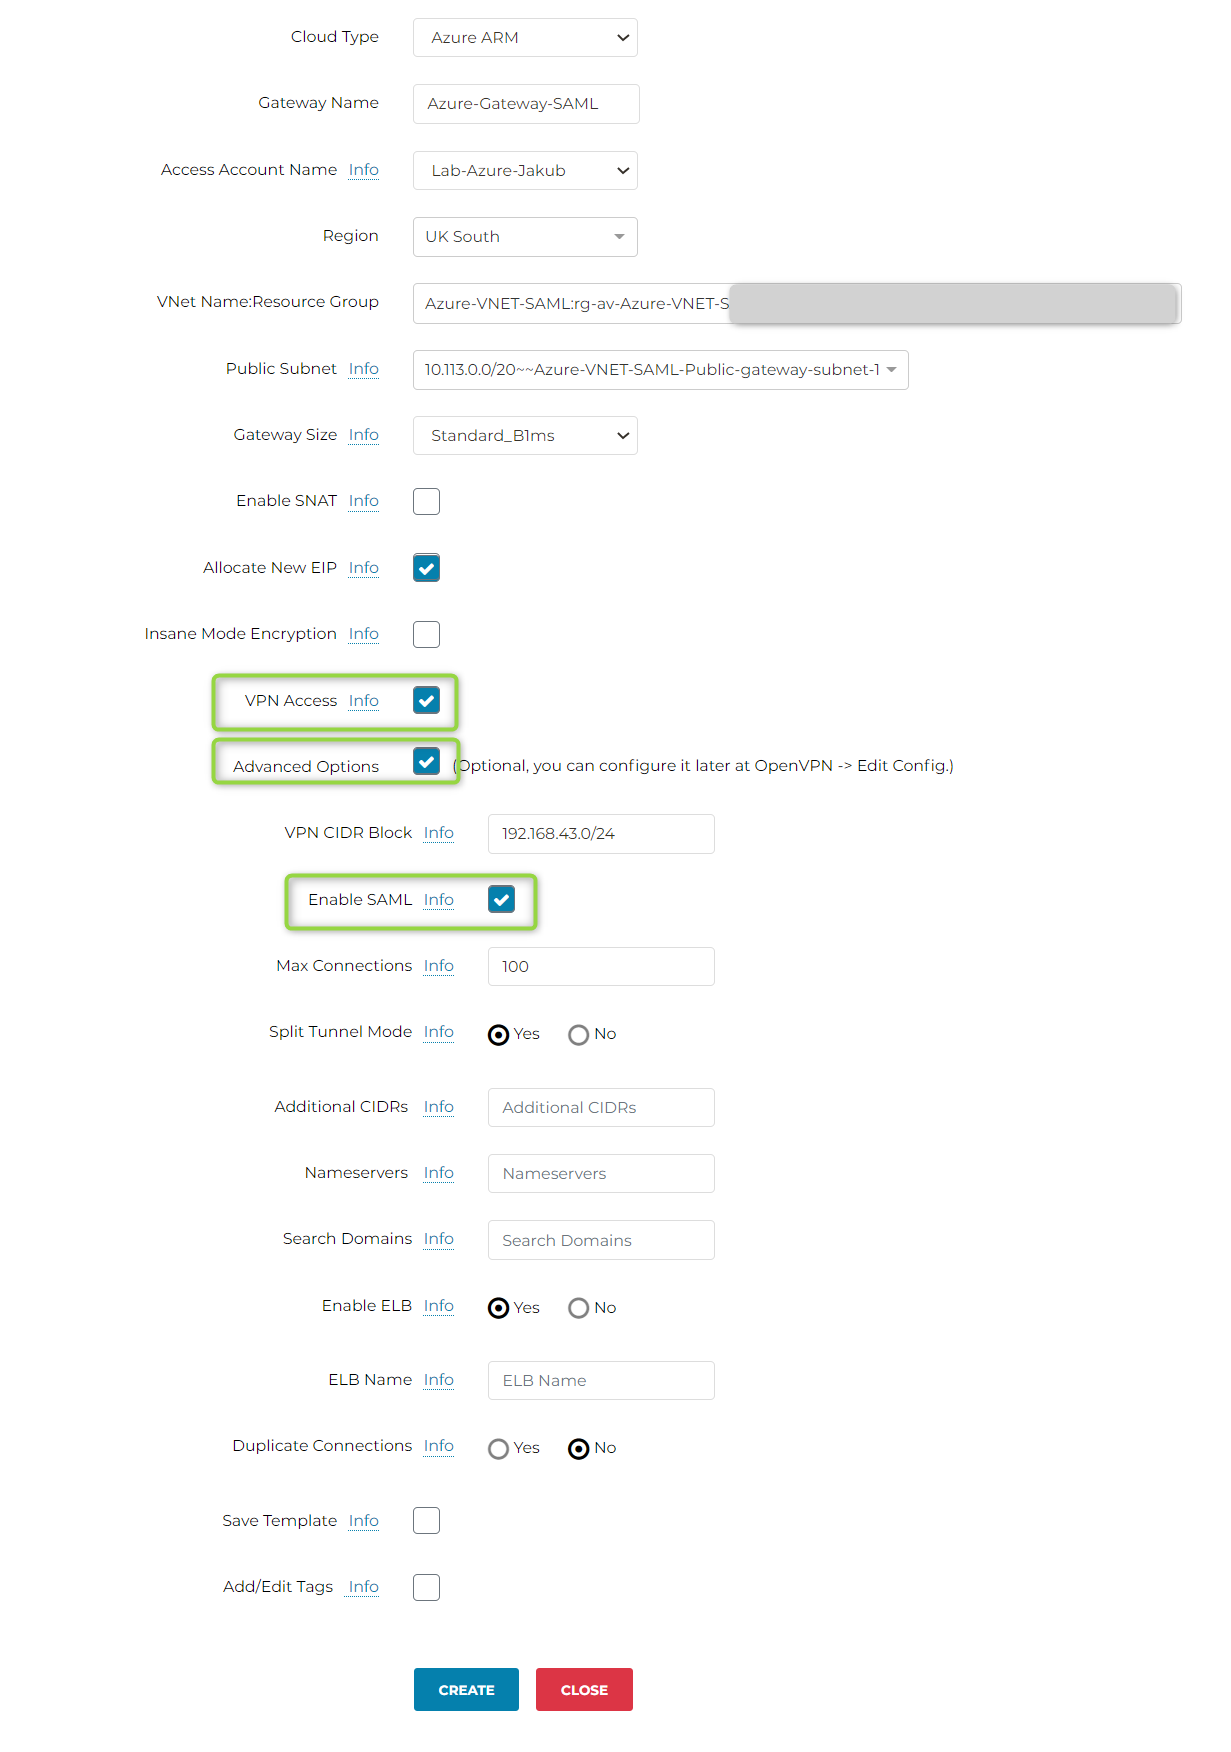
- Going back to our Gateway deployment page. The most important fields to select are “VPN Access”, “Advanced Options”, and “Enable SAML”. You can leave the remaining options as default.
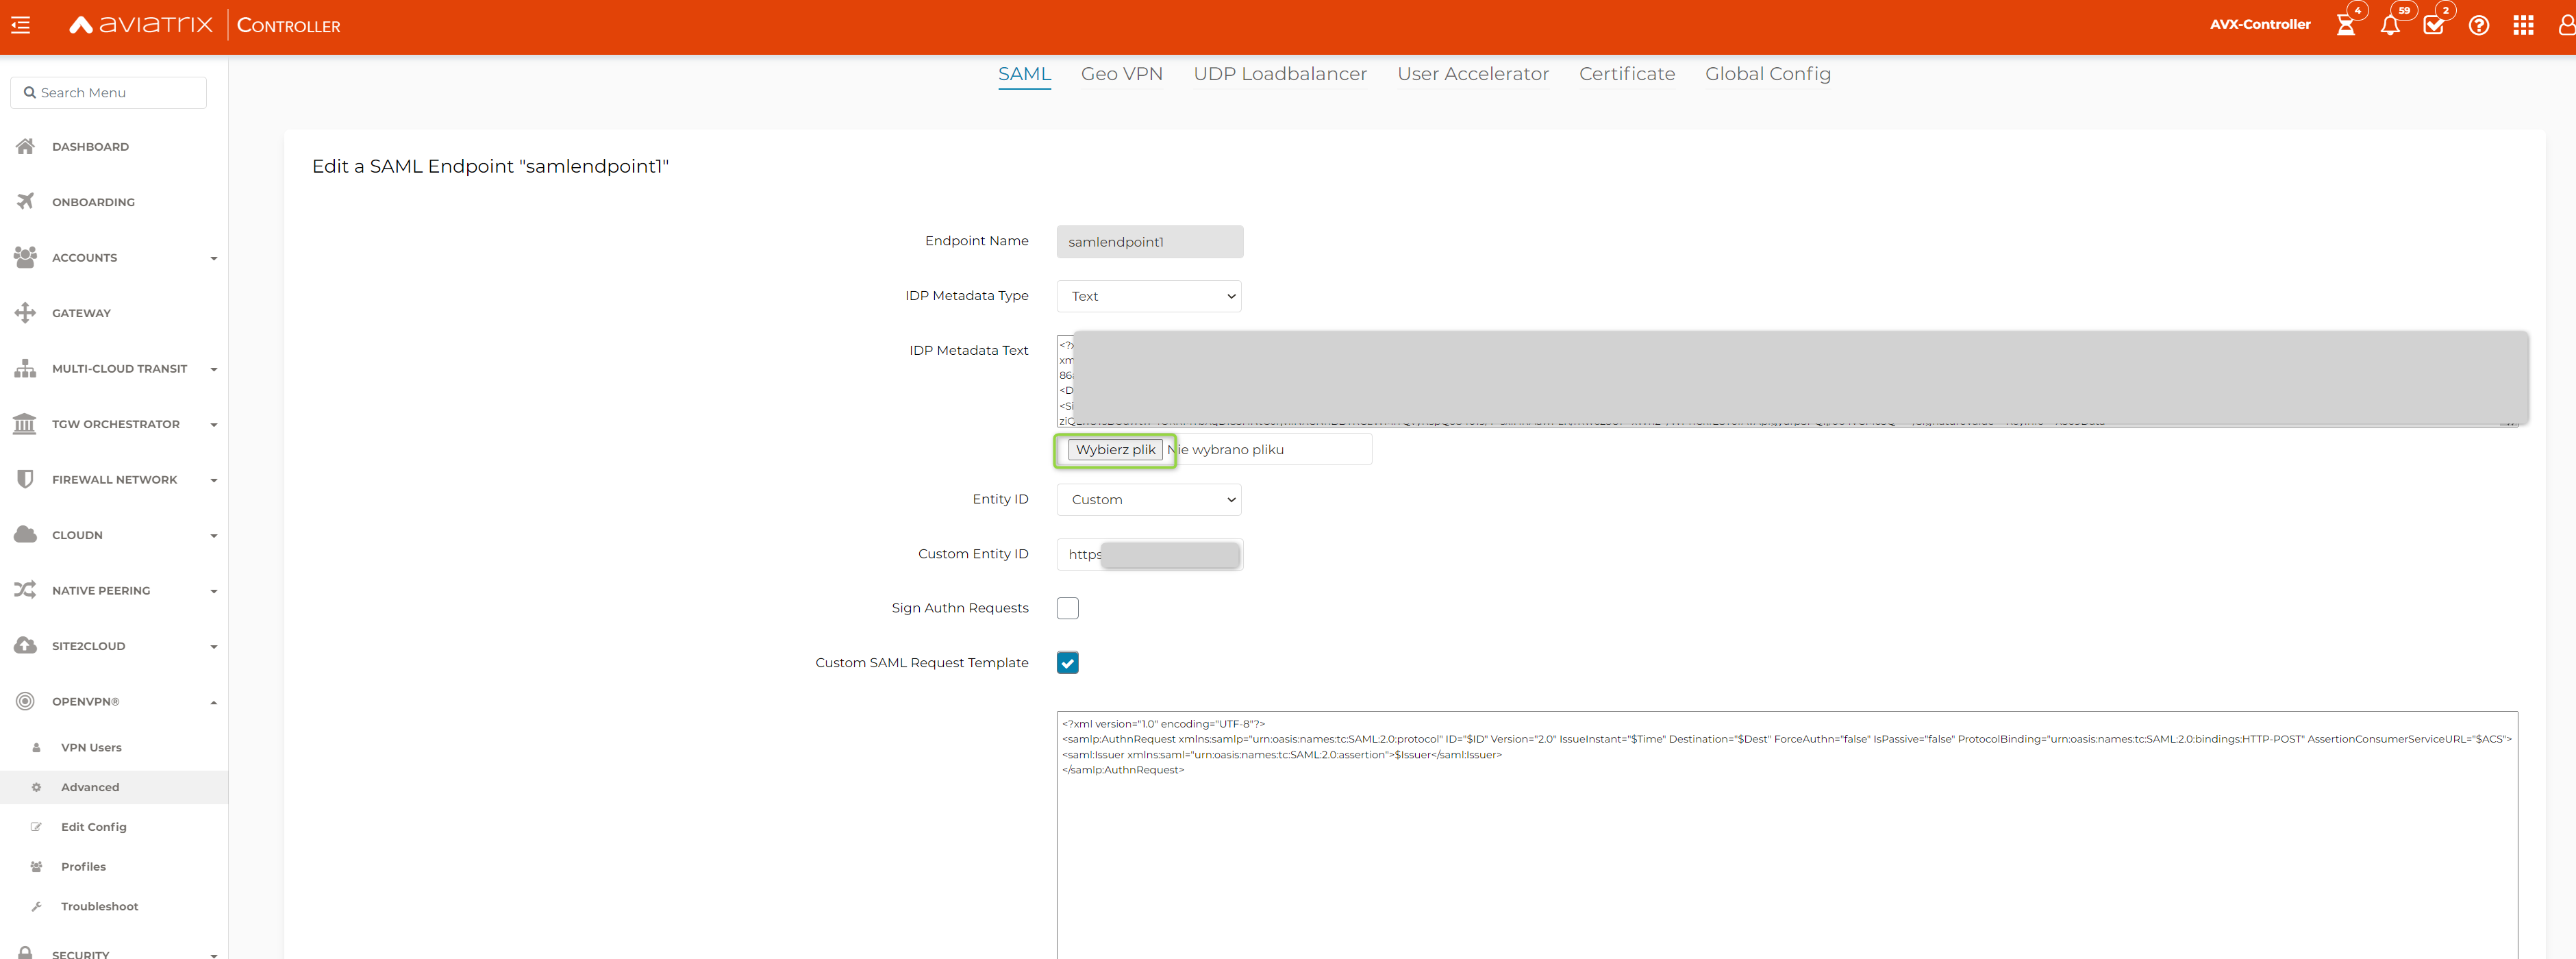
- Create an Aviatrix SAML Endpoint. Go to “OPENVPN” -> “Advanced” and “SAML” Tab. Select “Add New”.

- Fill in the Endpoint information
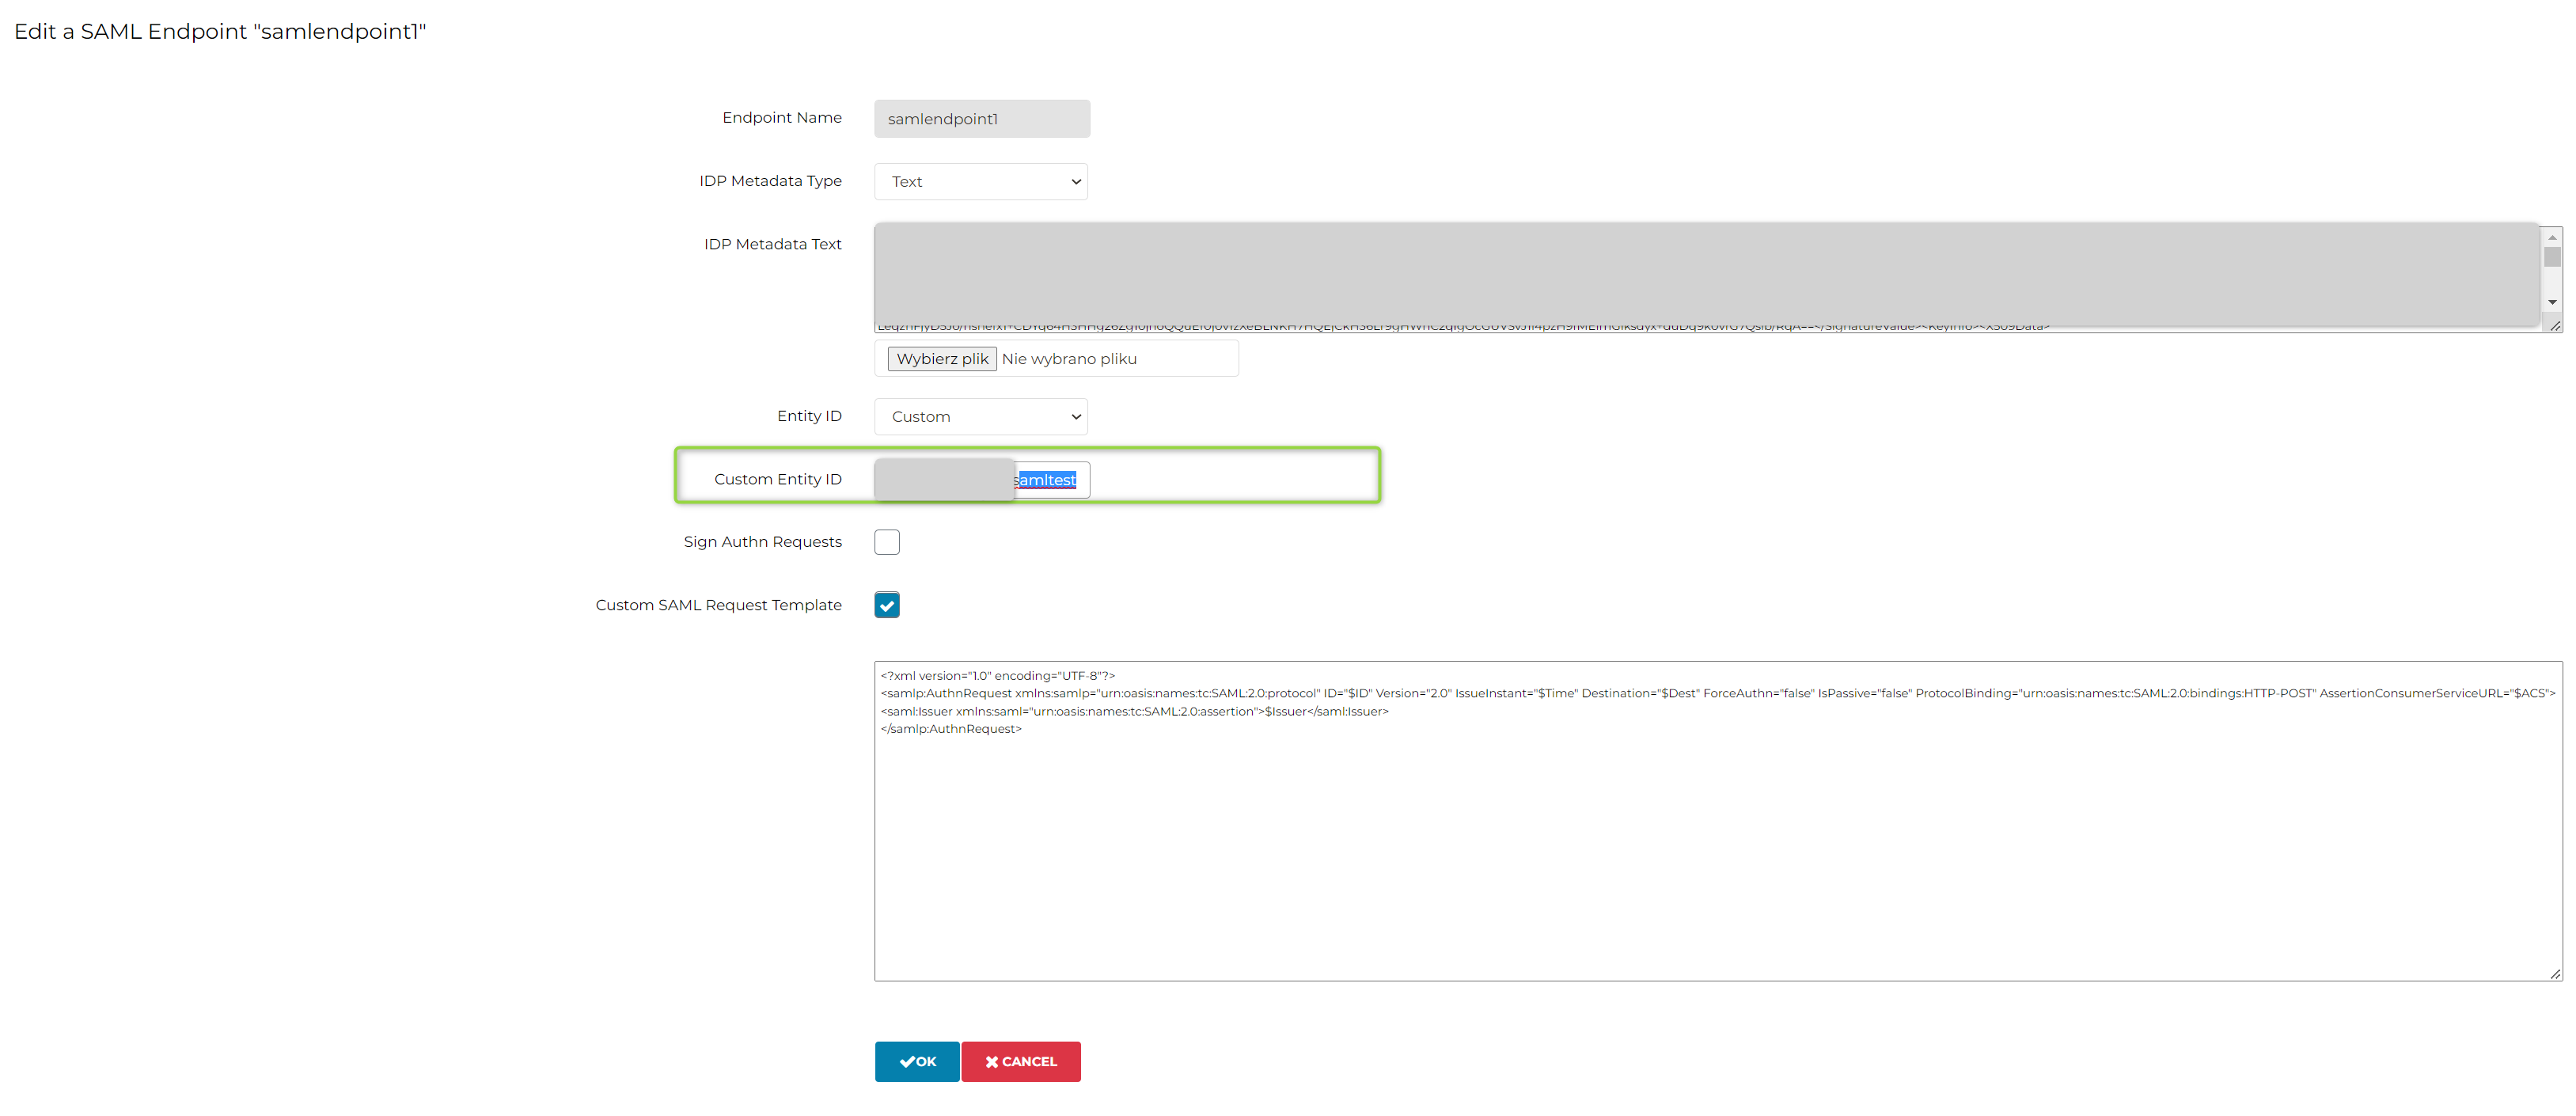
Endpoint Name – put the name you have already chosen during SAML configuration in Azure
IDP Metadata Type – change to Text. You will have to come back to this and Upload the “Metadata XML” file downloaded from Azure (it will be presented in a few steps once the Profile Claim is configured). You can put just random text now.
Entity ID – leave Hostname if you have one Application. Change to Custom if you have multiple Applications (in such a case provide the whole name, e.g. https://a.b.c.d/app2
Custom SAML Request Template – must be checked. Copy the following template (https://docs.aviatrix.com/HowTos/SAML_Integration_Azure_AD_IdP.html):
<samlp:AuthnRequest xmlns:samlp=”urn:oasis:names:tc:SAML:2.0:protocol” ID=”$ID” Version=”2.0″ IssueInstant=”$Time” Destination=”$Dest” ForceAuthn=”false” IsPassive=”false” ProtocolBinding=”urn:oasis:names:tc:SAML:2.0:bindings:HTTP-POST” AssertionConsumerServiceURL=”$ACS”> <saml:Issuer xmlns:saml=”urn:oasis:names:tc:SAML:2.0:assertion”>$Issuer |
Once done, the SAML Endpoint is created (but still with an incorrect Metadata Text now):

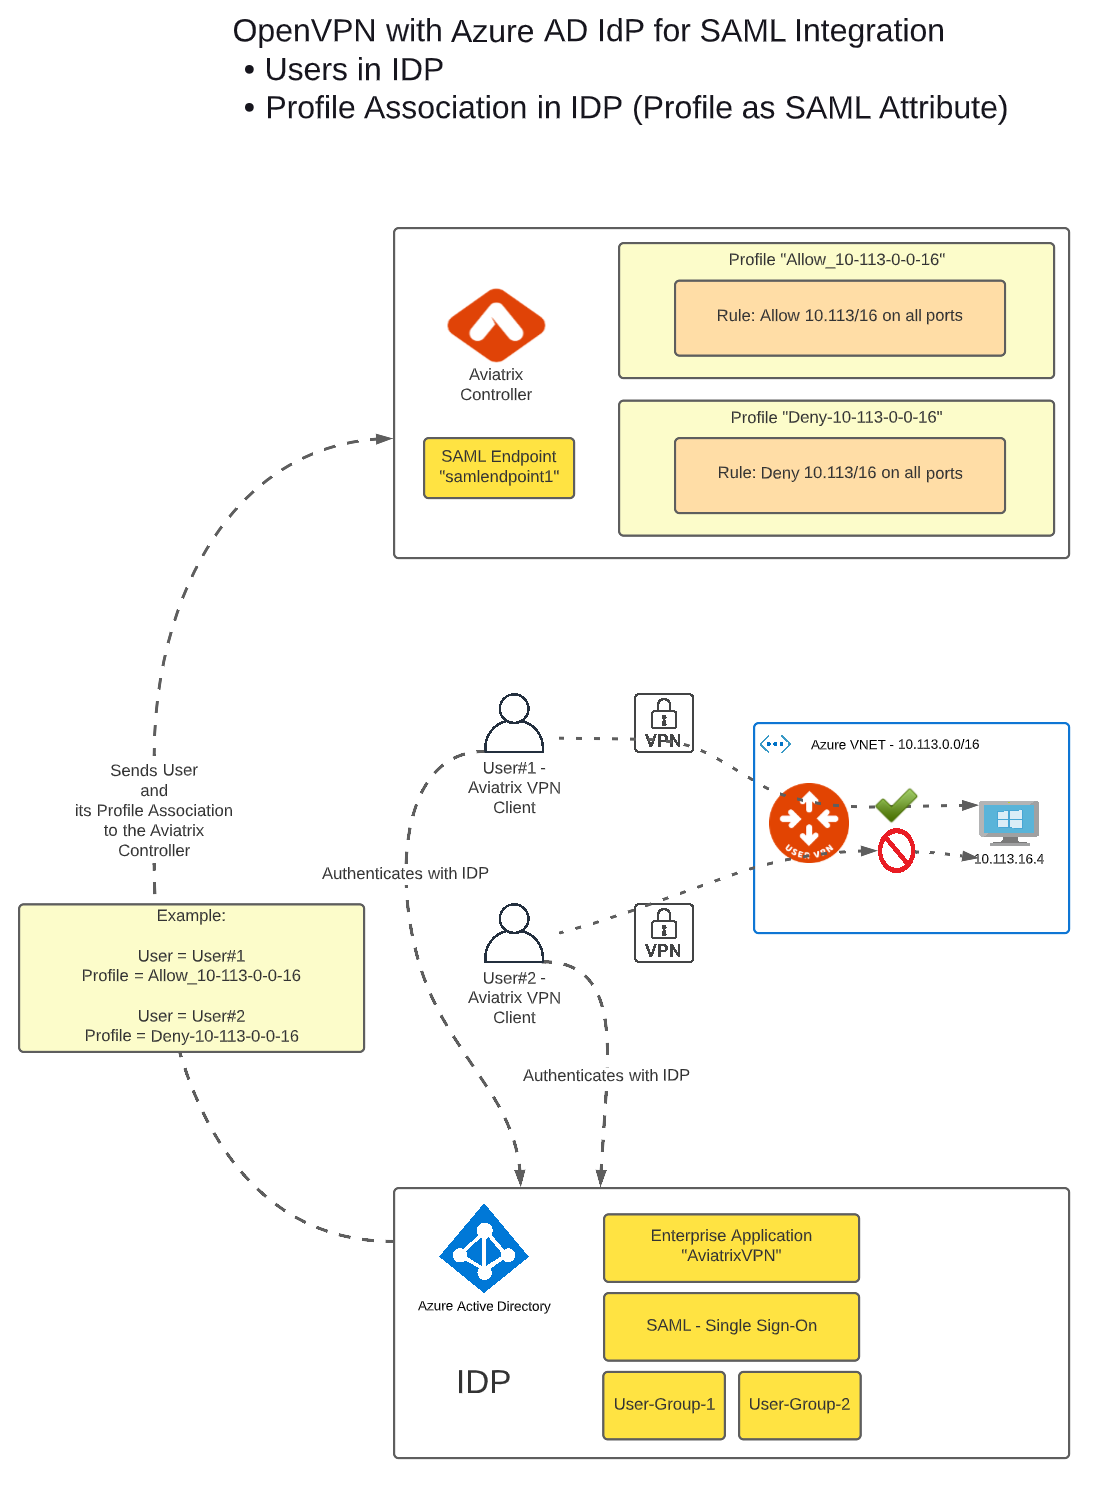
Even though the Profiles Association is done by Azure AD, the Profiles themselves are configured and maintained by the Aviatrix Controller. Profiles are controlling the connectivity between VPN Users and constructs (e.g. VM instances) in Azure.
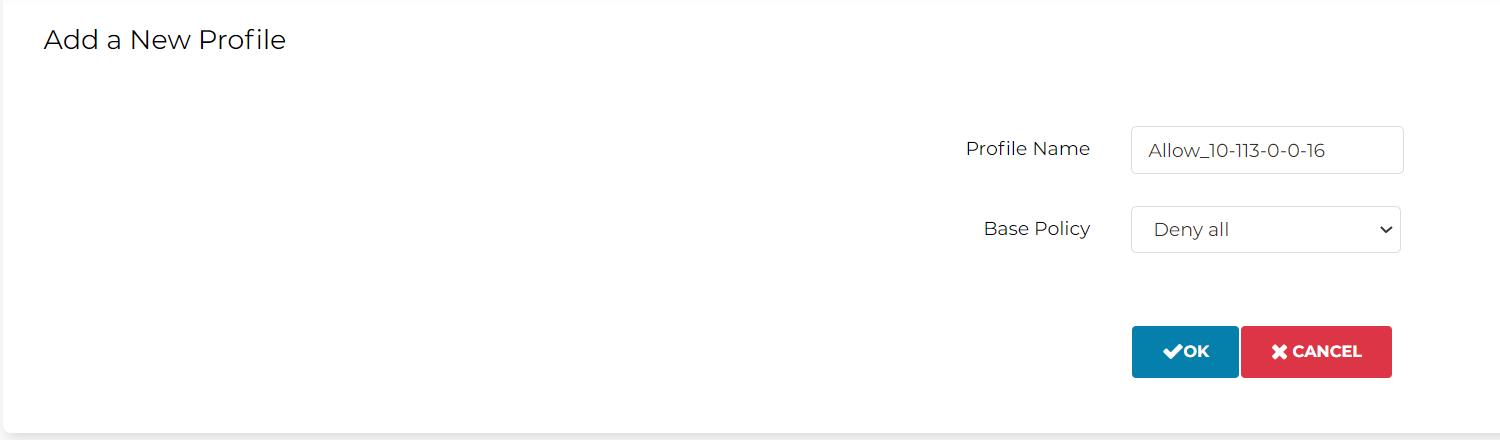
- Configure the Profiles you want to have. I will configure one profile (called “Deny-10-113-0-0-16”) that denies the communication to my VNET CIDR (10.113/16). The other (called “Allow_10-113-0-0-16”) will allow the communication to the CIDR (10.113/16).
- Go to the Aviatrix Controller -> “OPENVPN” -> “Profiles” -> “Add New”

- Create a Profile. The Baseline would be “Deny all”. As a next step, we will specify explicitly what communication is allowed.
- Edit the Profile and specify what communication is allowed


- Create another Profile. The Baseline would be “Allow all” this time. As a next step, we will specify explicitly what communication is denied.


Now, as we have our Profiles created, we can update the SAML configuration in Azure.
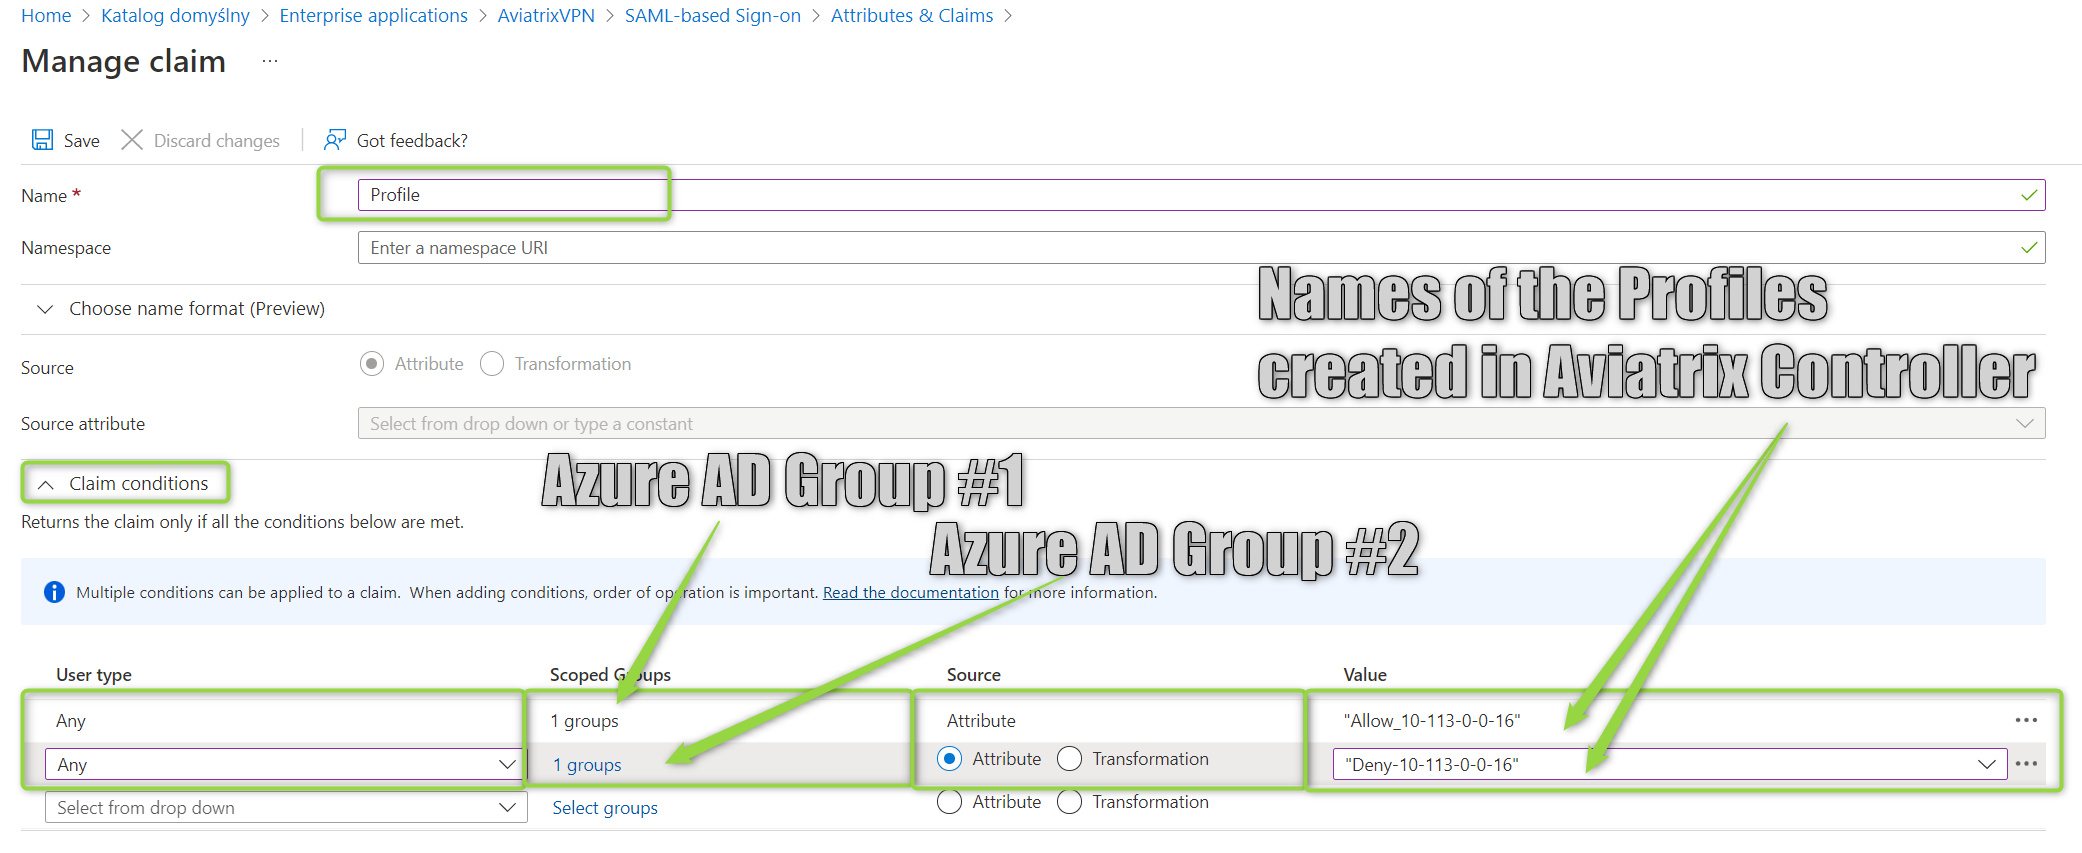
- Go to “Azure Active Directory” -> “Enterprise Applications” -> select your Application -> Single sign-on -> and Edit the “2 – Attributes & Claims”. Click on “Add New Claim”

Perform the following actions:
- Provide the Name = “Profile” (it is case-sensitive so it must be an uppercase “P”)
- Select “Claim conditions” to expand the options
- For claim condition #1:
- As a “User Type” choose “Any”
- Click on “Select groups”
- Choose the appropriate Group (e.g. Group#1)
- Click “Select” on the bottom of the page and choose the proper group
- The group is selected and now you can choose “Attribute” as a source and provide a Value. The Value is just a text/string. It must equal the profile name created in the Aviatrix Controller.
I have created two Azure AD Groups (Group#1 and Group#2). Each group has its Claim condition created with different profiles assigned:
Please keep in mind that according to the documentation ( https://docs.microsoft.com/en-us/azure/active-directory/develop/active-directory-saml-claims-customization?WT.mc_id=Portal-Microsoft_AAD_IAM ) – my tests confirmed it as well – if a member is part of more than one group, “the last value which matches the expression will be emitted in the claim”.
- Now you can download the “Metadata XML” file. It will be uploaded to the Aviatrix Controller Endpoint configuration.

- Go to the Aviatrix Controller -> “OPENVPN” -> “Advanced”. Select your SAML endpoint and choose “Edit”. Upload the Metadata XML file to the “IDP Metadata Text”.
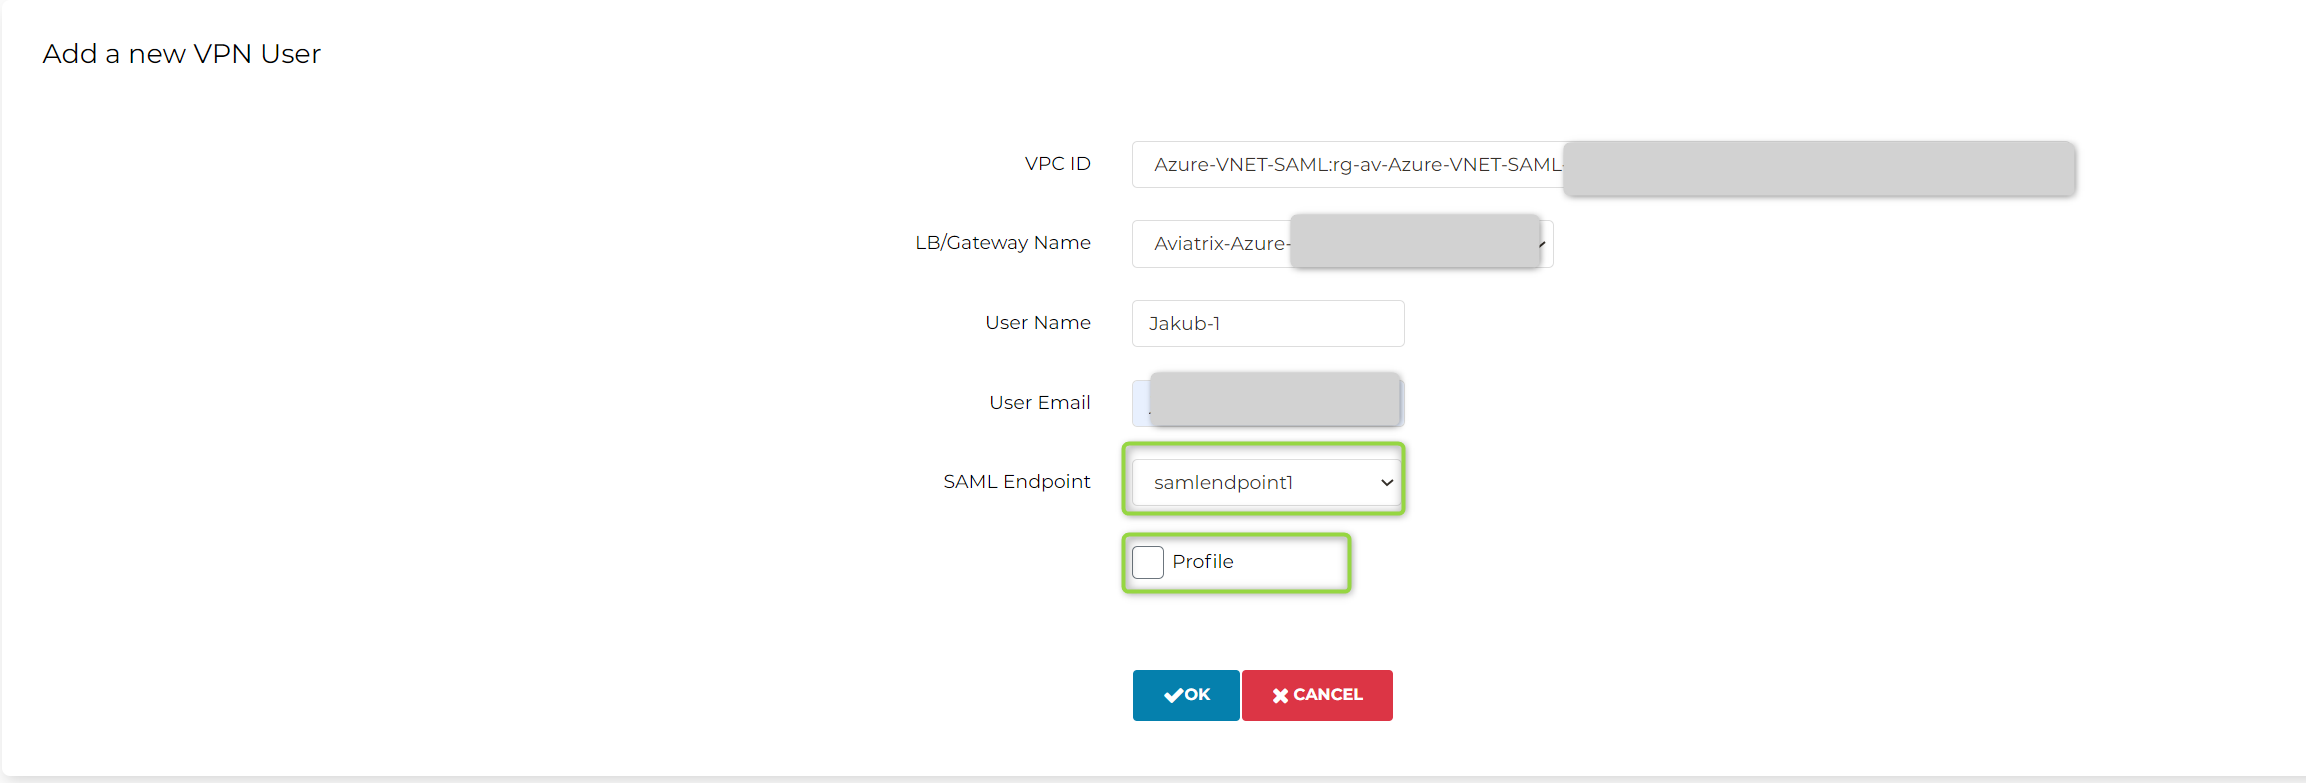
- Go to the Aviatrix Controller. Select “OPENVPN” -> “VPN Users” -> Add New” to add a new user. This user will have an ovpn file generated and it will be authenticated by Azure AD during the VPN connection set up.

- Select your VPC/VNET when the Aviatrix Gateway with VPN Access is located
- Select the Aviatrix Gateway with VPN Access
- Provide the User Name. It is only locally significant to Aviatrix Controller. It has no meaning when it comes to the authentication or Azure AD
- Provide the User Email. It is only locally significant to Aviatrix Controller. It has no meaning when it comes to the authentication or Azure AD
- Select the SAML Endpoint you want to use
- Profile must NOT be checked because the Profile Association will be done by IDP = Azure AD.
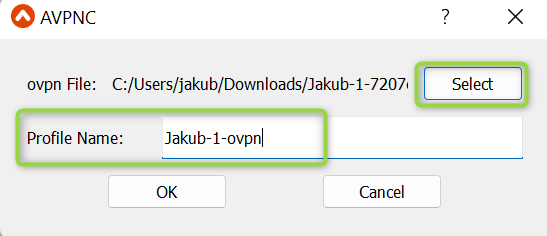
- Download ovpn file. Select the “User” -> “Actions” -> “Download”

- Download the Aviatrix VPN Client form https://docs.aviatrix.com/Downloads/samlclient.html
- Add the ovpn file to the Client using a button with the “+” sign

- Click on “Select” and choose the ovpn file. Provide the Profile Name. Please keep in mind the Profile Name is not related to the Profile Name created in the Aviatrix Controller or Azure AD. It is just local to the VPN Client.
To test that the solution works, I have created a VM Instance in Azure. The Private IP of the VM was 10.113.16.4.
Previously I have created two Profiles in the Aviatrix Controller. One Profile is allowing all traffic to the 10.113.0.0/16 network, the other is not. The test scenario is a simple PING executed from my laptop to the Private IP of the VM Instance. One PING should work (when the ping is executed by User #1 with an “Allow_10-113-0-0-16” Profile) but the other should not (when the ping is executed by User#2 with “Deny-10-113-0-0-16” Profile).
Testing with User#1 that traffic is allowed
- Go to the Aviatrix VPN Client
- Choose the Profile/ovpn created earlier and click on “Connect”

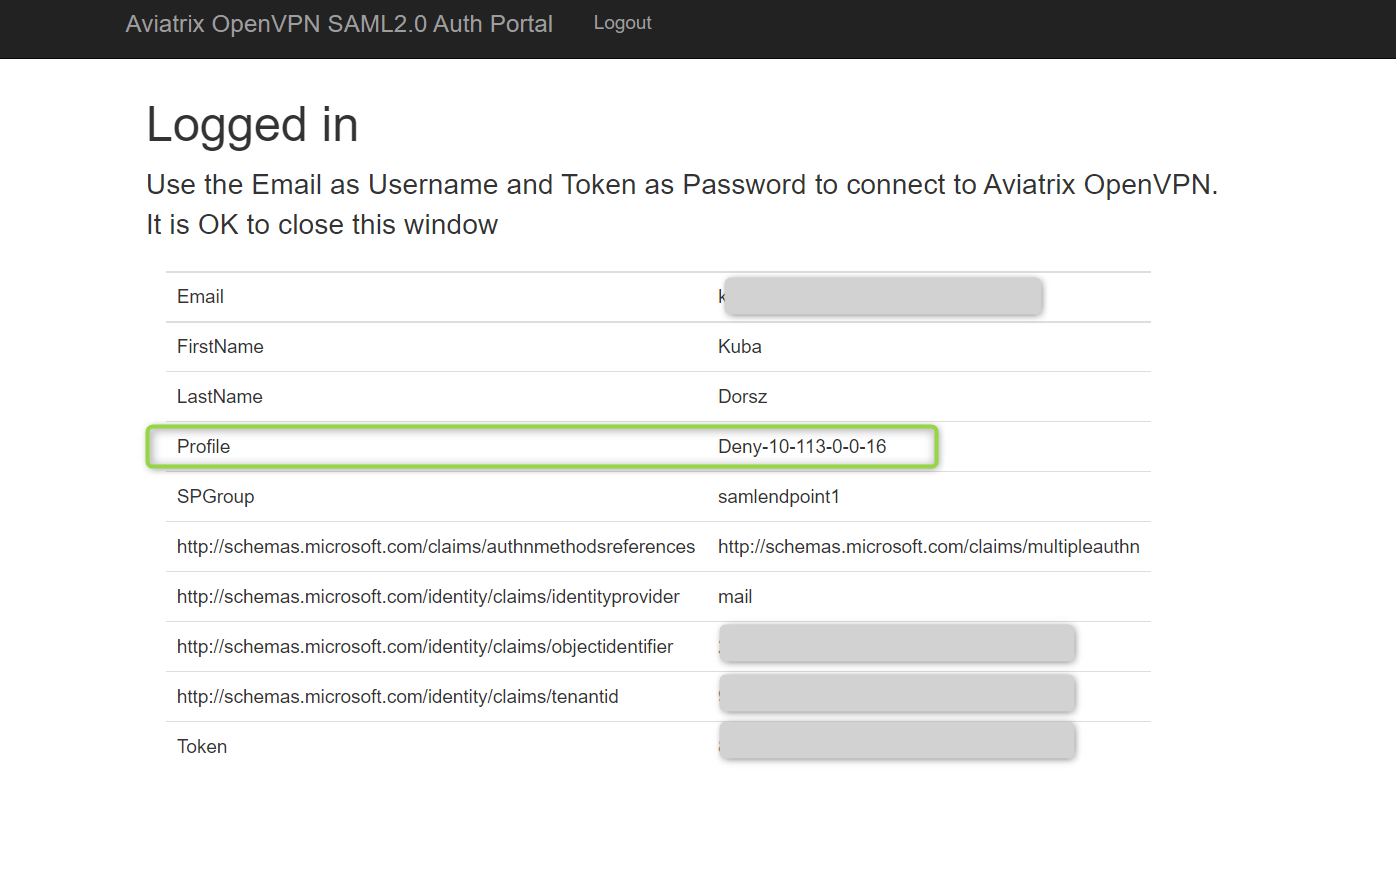
The page should be opened in your default browser. Please select the proper User. This time it is going to be the User that is a Member of Azure AD Group #1.

The next page will be displayed with all the attributes passed by Azure AD to the Aviatrix Controller. Please notice the Profile name associated with Azure AD.

Aviatrix VPN Client shows the Status “Connected”.

Open the Command Prompt / PowerShell to test the PING. But first, verify the routing table. The CIDR of your VNET should be present there.

And now test that PING is working.

- Disconnect your VPN
Testing with User#2 that traffic is not allowed
- Go to the Aviatrix VPN Client
- Choose the Profile/ovpn created earlier and click on “Connect”
The page should be opened in your default browser. Please select the proper User. This time it is going to be the User that is a Member of Azure AD Group #2.

The next page will be displayed with all the attributes passed by Azure AD to Aviatrix Controller. Please notice the Profile name associated with Azure AD.
The user will still get the route to VNET CIDR but this time the ping will not be working.

