
Introduction
There have been some blog articles already created describing the deployment of Fortigate Firewalls in Aviatrix Transit Firenet, incl. the best one that I have seen so far: Ricardo Trentin’s one. Nevertheless, I wanted to share additional pieces of information that might be informative.
The purpose of this post is to show:
- how to create Firenet from normal Aviatrix Transit VNET in Azure
- how to deploy Fortigate using specific image ID
- how to perform initial setup of Frotigate Firewalls
Fortigate in Azure Firenet - overview

The Aviatrix mc-firenet module will be used for deploying Firewalls in Azure Transit. The mc-firenet module must be used in conjunction with mc-transit module. Hence, It is required to deploy Transit VNET using mc-transit module first.
The mc-transit module creates VNET in Azure with few subnets (those subnets can be seen in the diagram above). From Fortigate FW1’s perspective the most important ones are:
• “-Public-FW-ingress-egress-1” where Network Interface of FW1 port1 (Internet/WAN) is placed
• “-dmz-firewall-lan” where Network Interface of FW1 port 2 (LAN) is placed
In case of FW2 those subnets are called “-Public-FW-ingress-egress-2” and “-hagw-dmz-firewall-lan” respectively.
1 - Deploying the Fortigate Firewalls using Terraform
I have created Transit VNET using the following TF code:
					module "mc-transit" {
  source                 = "terraform-aviatrix-modules/mc-transit/aviatrix"
  version                = "2.4.0"
  cloud                  = "Azure"
  cidr                   = "10.11.0.0/16"
  region                 = "East US"
  account                = "Azure-Jakub"
  enable_transit_firenet = true
  instance_size          = "Standard_B2ms"
}
Now, it is time to create Fortigate Firewalls (two of them) using mc-firenet module. As you may notice below, we will use data source to gather the CIDR used by “-Public-FW-ingress-egress-1” subnet. The same CIDR is used for both “egress_cidr” and “mgmt_cidr” as there is no separate mgmt interface in Fortigate.
Please notice that if you want to use the FortiOS version that is not listed in Controller GUI, you must use the “firewall_image_id” argument instead of “firewall_Image_version” (as shown above).
Creating REST_API User
The REST_API user will be created using Fortigate GUI. The user will have Admin Profile assigned.
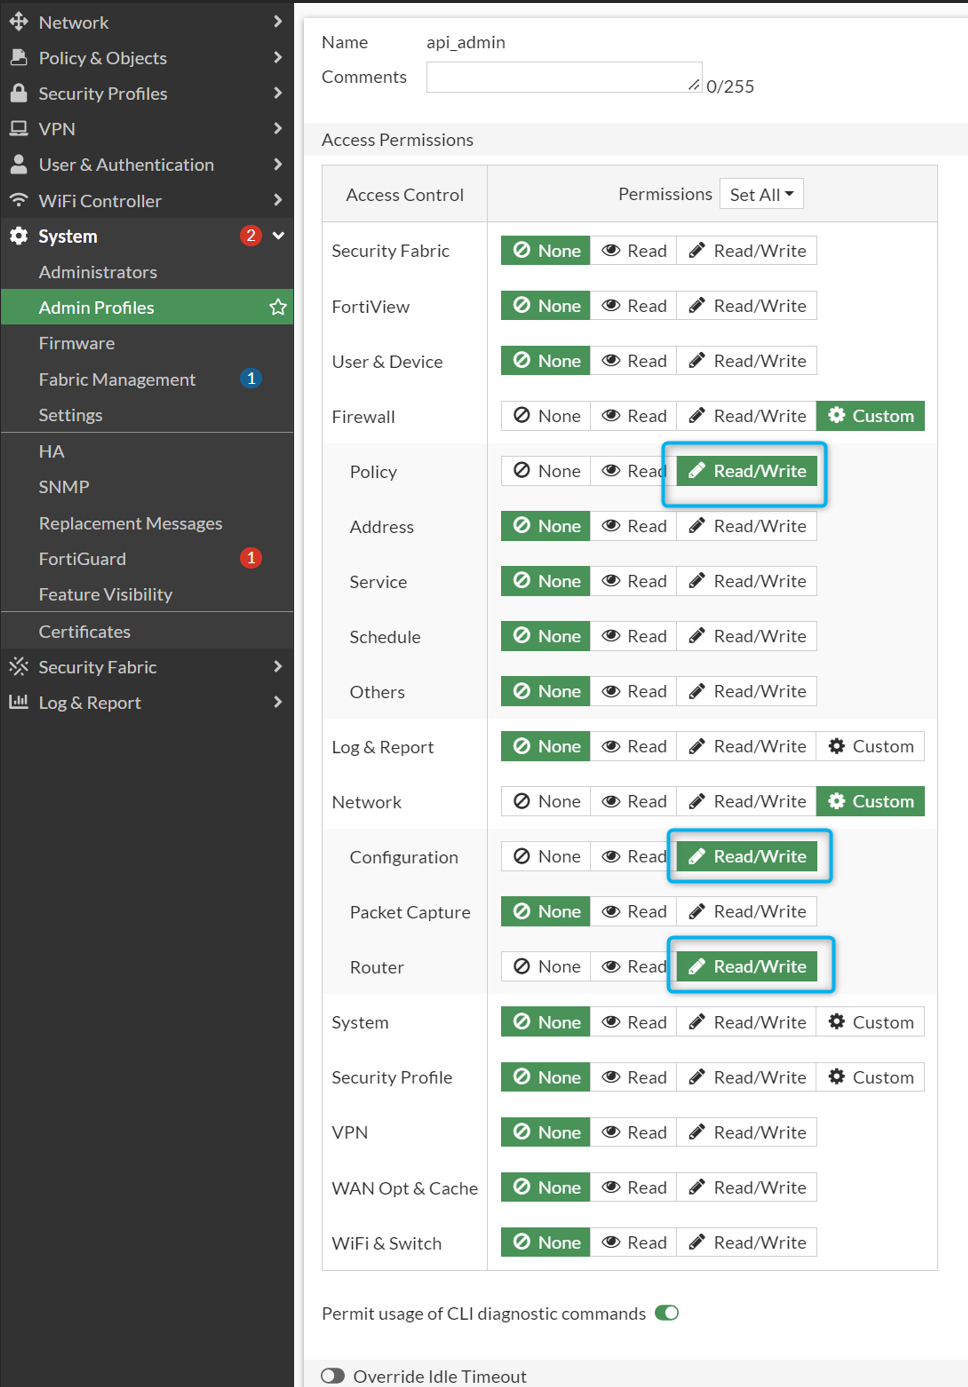
Let’s create Admin Profile “api_admin” first:
					data "azurerm_subnet" "public_ingress_egress_firewall_subnet" {
  name                 = "${module.mc-transit.vpc.name}-Public-FW-ingress-egress-1"
  virtual_network_name = module.mc-transit.vpc.name
  resource_group_name  = module.mc-transit.vpc.resource_group
}

module "mc-firenet" {
  source  = "terraform-aviatrix-modules/mc-firenet/aviatrix"
  version = "1.4.0"

  #required:
  transit_module = module.mc-transit
  firewall_image = "Fortinet FortiGate (PAYG_20190624) Next-Generation Firewall Latest Release" # name as it appears in Aviatrix Controller GUI: Firewall Network -> Setup -> Firewall -> step 2a, field: Firewall Image

  #optional:
  custom_fw_names = ["Azure-FW1", "Azure-FW2"]
  #firewall_image_version = "7.0.5"                                                              # Aviatrix Controller GUI: Firewall Network -> Setup -> Firewall -> step 2a, field: Firewall Image Version
  firewall_image_id  = "fortinet:fortinet_fortigate-vm_v5:fortinet_fg-vm_payg_2022:7.0.9"       # if firewall_image_id is used -> argument firewall_image_version must be commented out
  fw_amount          = "2"
  egress_cidr        = data.azurerm_subnet.public_ingress_egress_firewall_subnet.address_prefix # Public-FW-ingress-egress-1 subnet CIDR for FW az-1
  egress_enabled     = true                                                                     # default = false, once set to true a default route will be generated by Transit GW and advertised everywhere
  inspection_enabled = true
  instance_size      = "Standard_D3_v2"
  mgmt_cidr          = data.azurerm_subnet.public_ingress_egress_firewall_subnet.address_prefix # Public-FW-ingress-egress-1 subnet CIDR for FW az-1
  username           = "fwadmin"                                                                # default username is fwadmin
  password           = "<your_password>"
}

The set of permissions depends on the pieces of configuration you want to modify later with Terraform, e.g.
- interface/port – requires Read/Write for Network/Configuration
- (optionally) static route – requires Read/Write for Network/Router
- (optionally) policy – requires Read/Write for Firewall/Policy
Once Admin Profile is there, the REST-API user can be created:

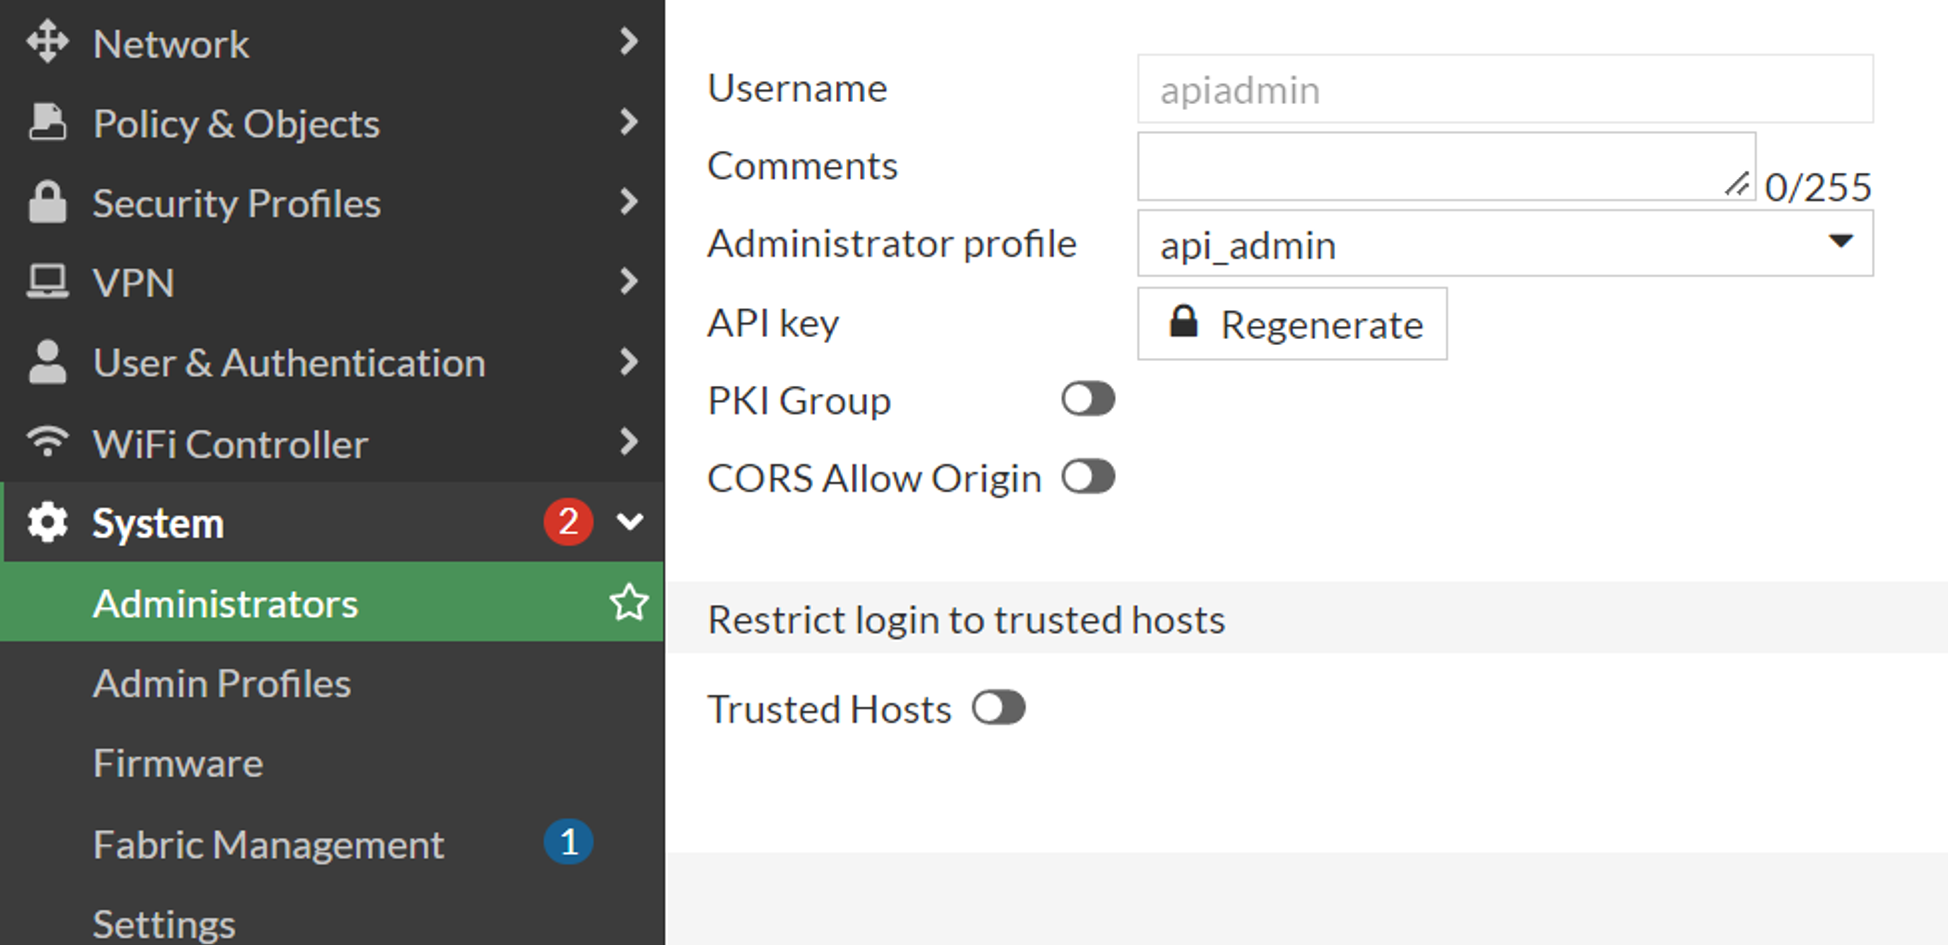
Please copy the Token for the API-admin user and store it in a safe place. It will be required in the configuration later.
Fortigate Provider in Terraform
The “fortios” is the name of the provider to be used in Terraform.
There are two Firewalls deployed => which means two Tokens => and two provider sections must be configured. The Terraform “alias” will be used to distinguish between FW-1 and FW-2.
The “azurerm” provider is required by data sources used later.
					terraform {
  required_providers {
    aviatrix = {
      source = "AviatrixSystems/aviatrix"
      version = "3.0.0"
    }

    azurerm = {
      source  = "hashicorp/azurerm"
      version = ">= 2.39"
    }

    fortios = {
      source = "fortinetdev/fortios"
      version = "1.16.0"
    }
  }
}


provider "aviatrix" {
  # Aviatrix Controller
  username      = var.controller_username
  password      = var.controller_password
  controller_ip = var.controller_ip
}

provider "fortios" {
  hostname = "<Public-IP-FW1>"                  # IP of the FW
  token    = "<Token-FW1>"                      # token from FW GUI for REST API admin. data source can be used with a reference to Key Vault or Secrets Manager
  insecure = "true"
  alias    = "fw1"
}

provider "fortios" {
  hostname = "<Public-IP-FW2>"                  # IP of the FW
  token    = "<Token-FW1>"                      # token from FW GUI for REST API admin. data source can be used with a reference to Key Vault or Secrets Manager
  insecure = "true"
  alias    = "fw2"
}

provider "azurerm" {
  features {}
}
Fortigate Interface Configuration using Terraform
The WAN interface (port1) is configured properly by default. Though port2 (LAN interface) configuration must be adjusted (and its default config varies between FortiOS versions).
Use the following TF code to configure port2 (Read/Write permission for Network/Configuration is required):
					# Configure port2 (LAN) for Firewall Instance [0]
resource "fortios_system_interface" "fw1_lan_intf" {
  provider     = fortios.fw1
  algorithm    = "L4"
  defaultgw    = "disable" #default gateway from dhcp must be disabled
  alias        = "lan-int"
  mtu          = 1500
  mtu_override = "disable"
  name         = "port2"
  type         = "physical"
  vdom         = "root"
  mode         = "dhcp"
  allowaccess  = "https" #https required by Azure LB Health Checks
  depends_on   = [module.mc-firenet]
}

# Configure port2 (LAN) for Firewall Instance [1]
resource "fortios_system_interface" "fw2_lan_intf" {
  provider     = fortios.fw2
  algorithm    = "L4"
  defaultgw    = "disable" #default gateway from dhcp must be disabled
  alias        = "lan-int"
  mtu          = 1500
  mtu_override = "disable"
  name         = "port2"
  type         = "physical"
  vdom         = "root"
  mode         = "dhcp"
  allowaccess  = "https" #https required by Azure LB Health Checks
  depends_on   = [module.mc-firenet]
}
Aviatrix Vendor Integration using Terraform
The “Vendor Integration” feature configures static routes (for RFC1918 and Azure LB HealthCheck) on Fortigate.
Please notice that a Fortigate token for REST_API is required.
And REST_API user must have the following permission: Read/Write for both Network/Router Network/Configuration.
					# Fortigates tokens can be stored in Key Vault or Secret Manager and referenced as data source
# Remark: appropriate KeyVault Access Policy must be set
data "azurerm_key_vault_secret" "fortigate11token" {
  name         = "fortigate11token"
  key_vault_id = "/subscriptions/0820a232-xxxxxxxxxx/resourceGroups/fw_yara_kv/providers/Microsoft.KeyVault/vaults/fwyarakv" # ID from JSON view of KeyVault
}

data "azurerm_key_vault_secret" "fortigate12token" {
  name         = "fortigate12token"
  key_vault_id = "/subscriptions/0820a232-xxxxxxxxxx/resourceGroups/fw_yara_kv/providers/Microsoft.KeyVault/vaults/fwyarakv" # ID from JSON view of KeyVault
}

data "aviatrix_firenet_vendor_integration" "fw1" {
  vpc_id        = module.mc-transit.transit_gateway.vpc_id
  instance_id   = module.mc-firenet.aviatrix_firewall_instance[0].instance_id
  vendor_type   = "Fortinet FortiGate"                                      # "Generic", "Palo Alto Networks VM-Series", "Aviatrix FQDN Gateway" and "Fortinet FortiGate"
  public_ip     = module.mc-firenet.aviatrix_firewall_instance[0].public_ip
  username      = "apiadmin"                                                # REST_API user
  password      = module.mc-firenet.aviatrix_firewall_instance[0].password
  api_token     = data.azurerm_key_vault_secret.fortigate11token.value       # Fortigate REST_API user token for FW1
  firewall_name = module.mc-firenet.aviatrix_firewall_instance[0].firewall_name
  save          = true
  #synchronize   = true # "save" and "synchronize" cannot be invoked at the same time
}

data "aviatrix_firenet_vendor_integration" "fw2" {
  vpc_id        = module.mc-transit.transit_gateway.vpc_id
  instance_id   = module.mc-firenet.aviatrix_firewall_instance[1].instance_id
  vendor_type   = "Fortinet FortiGate"                                      # "Generic", "Palo Alto Networks VM-Series", "Aviatrix FQDN Gateway" and "Fortinet FortiGate"
  public_ip     = module.mc-firenet.aviatrix_firewall_instance[1].public_ip
  username      = "apiadmin"                                                # REST_API user
  password      = module.mc-firenet.aviatrix_firewall_instance[1].password
  api_token     = data.azurerm_key_vault_secret.fortigate12token.value       # Fortigate REST_API user token for FW2
  firewall_name = module.mc-firenet.aviatrix_firewall_instance[1].firewall_name
  save          = true
  #synchronize   = true # "save" and "synchronize" cannot be invoked at the same time
}
The following routes are configured after successful Vendor Integration:

Optional: Static Routes configuration using TF instead of Aviatrix Vendor Integration
Please notice that if you do not want to use Aviatrix Vendor Integration (though I cannot see any reason for not using it) you can create all the static routes using thefortios resource called “fortios_router_static”. Example below:
					##############################################################################
# Optional: Static Route
# Static Routes will be configured via Aviatrix Vendor Integration feature
# However, if required, static route can be configured using TF code
# Example of the code is presented below
##############################################################################

# Data Sources are required in order to configure static route on FW with appropriate next-hop IP
data "azurerm_subnet" "dmz_firewall_lan_1" {
  name                 = "av-gw-${module.mc-transit.vpc.name}-dmz-firewall-lan"
  virtual_network_name = module.mc-transit.vpc.name
  resource_group_name  = module.mc-transit.vpc.resource_group
}

data "azurerm_subnet" "dmz_firewall_lan_2" {
  name                 = "av-gw-${module.mc-transit.vpc.name}-hagw-dmz-firewall-lan"
  virtual_network_name = module.mc-transit.vpc.name
  resource_group_name  = module.mc-transit.vpc.resource_group
}

# Configure static route for Azure LB Health Checks
resource "fortios_router_static" "fw1_route_azurelb_hc" {
  provider        = fortios.fw1
  comment         = "Route for Azure Load Balancer Health Check"
  device          = "port2" # fixed port/interface number
  distance        = 10
  dst             = "168.63.129.16 255.255.255.255" # fixed IP address 168.63.129.16 255.255.255.255
  dynamic_gateway = "disable"
  gateway         = "${tonumber(split(".", split("/", data.azurerm_subnet.dmz_firewall_lan_1.address_prefix)[0])[0])}.${tonumber(split(".", split("/", data.azurerm_subnet.dmz_firewall_lan_1.address_prefix)[0])[1])}.${tonumber(split(".", split("/", data.azurerm_subnet.dmz_firewall_lan_1.address_prefix)[0])[2])}.${tonumber(split(".", split("/", data.azurerm_subnet.dmz_firewall_lan_1.address_prefix)[0])[3]) + 1}" #"10.11.0.81" #next-hop equals to dmz-fiewall-lan virtual router IP x.x.x.81, or hagw-dmz-fiewall-lan virtual router IP x.x.x.129. Expression takes subnet_range and adds +1 to the last octet
  src             = "0.0.0.0 0.0.0.0"
  status          = "enable"
  depends_on      = [module.mc-firenet]
}

# Configure static route for Azure LB Health Checks
resource "fortios_router_static" "fw2_route_azurelb_hc" {
  provider        = fortios.fw2
  comment         = "Route for Azure Load Balancer Health Check"
  device          = "port2" # fixed port/interface number
  distance        = 10
  dst             = "168.63.129.16 255.255.255.255" # fixed IP address
  dynamic_gateway = "disable"
  gateway         = "${tonumber(split(".", split("/", data.azurerm_subnet.dmz_firewall_lan_2.address_prefix)[0])[0])}.${tonumber(split(".", split("/", data.azurerm_subnet.dmz_firewall_lan_2.address_prefix)[0])[1])}.${tonumber(split(".", split("/", data.azurerm_subnet.dmz_firewall_lan_2.address_prefix)[0])[2])}.${tonumber(split(".", split("/", data.azurerm_subnet.dmz_firewall_lan_2.address_prefix)[0])[3]) + 1}" #"10.11.0.81" #next-hop equals to dmz-fiewall-lan virtual router IP x.x.x.81, or hagw-dmz-fiewall-lan virtual router IP x.x.x.129. Expression takes subnet_range and adds +1 to the last octet
  src             = "0.0.0.0 0.0.0.0"
  status          = "enable"
  depends_on      = [module.mc-firenet]
}
Optional: Policy Rules creation using Terraform
The following code presents how to create Policy rule using Terraform.
					##############################################################################
# Optional: Fortigate Default LAN allow any/any Policy for East-West traffic
##############################################################################
resource "fortios_firewall_policy" "fw1_default_lan_allow" {
  provider = fortios.fw1
  name     = "Default LAN to LAN Allow All"

  srcaddr { name = "all" }
  srcintf { name = "port2" }

  dstaddr { name = "all" }
  dstintf { name = "port2" }

  service { name = "ALL" }

  action     = "accept"
  logtraffic = "all"
  logtraffic_start = "enable" # for loggin traffic when the session starts

  nat    = "disable"
  status = "enable"
}

resource "fortios_firewall_policy" "fw2_default_lan_allow" {
  provider = fortios.fw2
  name     = "Default LAN to LAN Allow All"

  srcaddr { name = "all" }
  srcintf { name = "port2" }

  dstaddr { name = "all" }
  dstintf { name = "port2" }

  service { name = "ALL" }

  action     = "accept"
  logtraffic = "all"
  logtraffic_start = "enable" # for loggin traffic when the session starts

  nat    = "disable"
  status = "enable"
}
2 - Verification
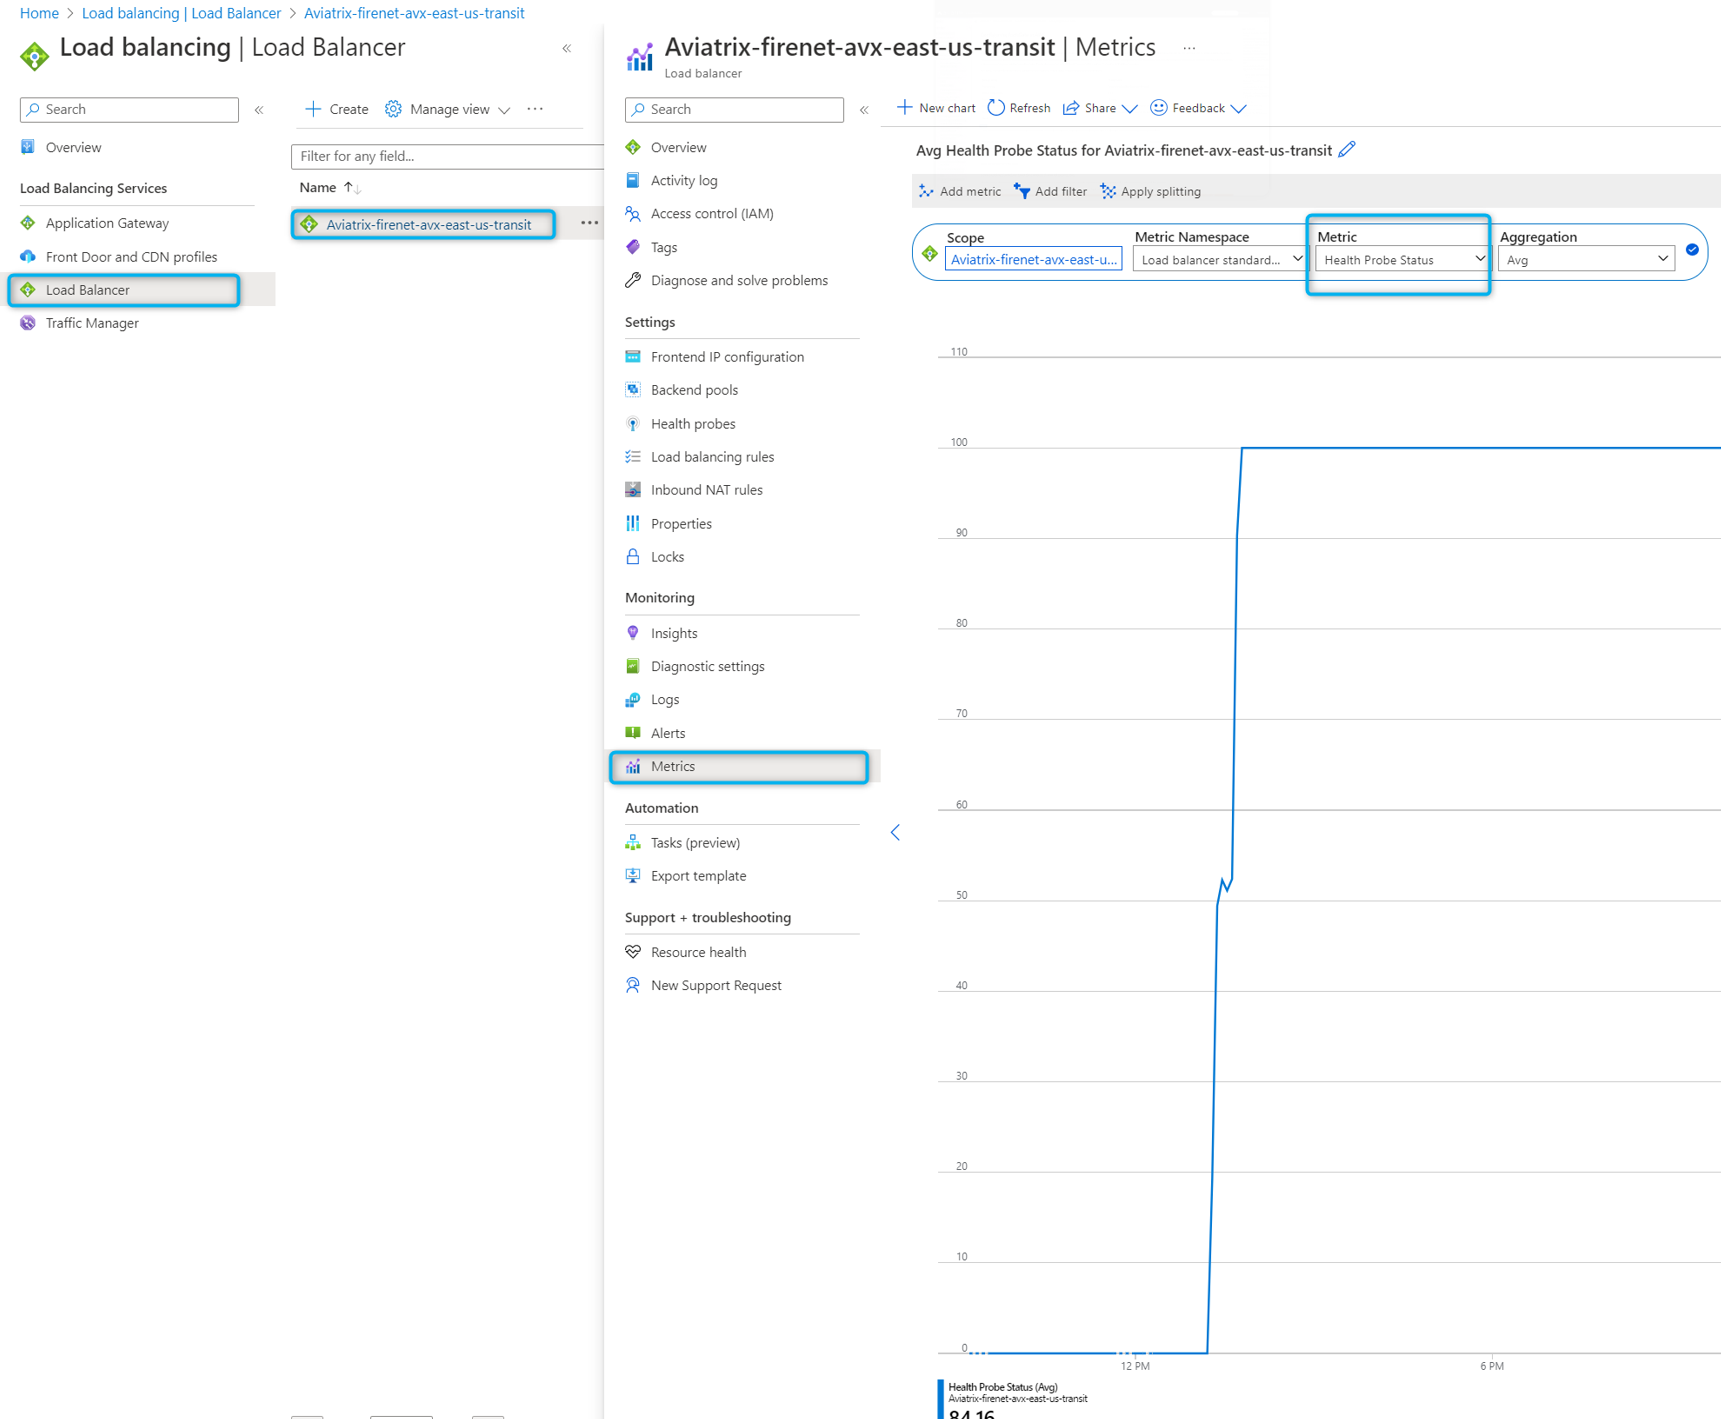
Azure LB Health Check probes
Once the Static Route for Azure LB HealthCheck is created (either using Aviatrix Vendor Integration or Terraform resource) you can check the Health Check status in Azure Portal.
Go to Load Balancer -> select the proper LB -> Metrics
Change the Metric to Health Probe Status
Health Checks must be successful for Azure Load Balancer to send traffic to Fortigate FWs.
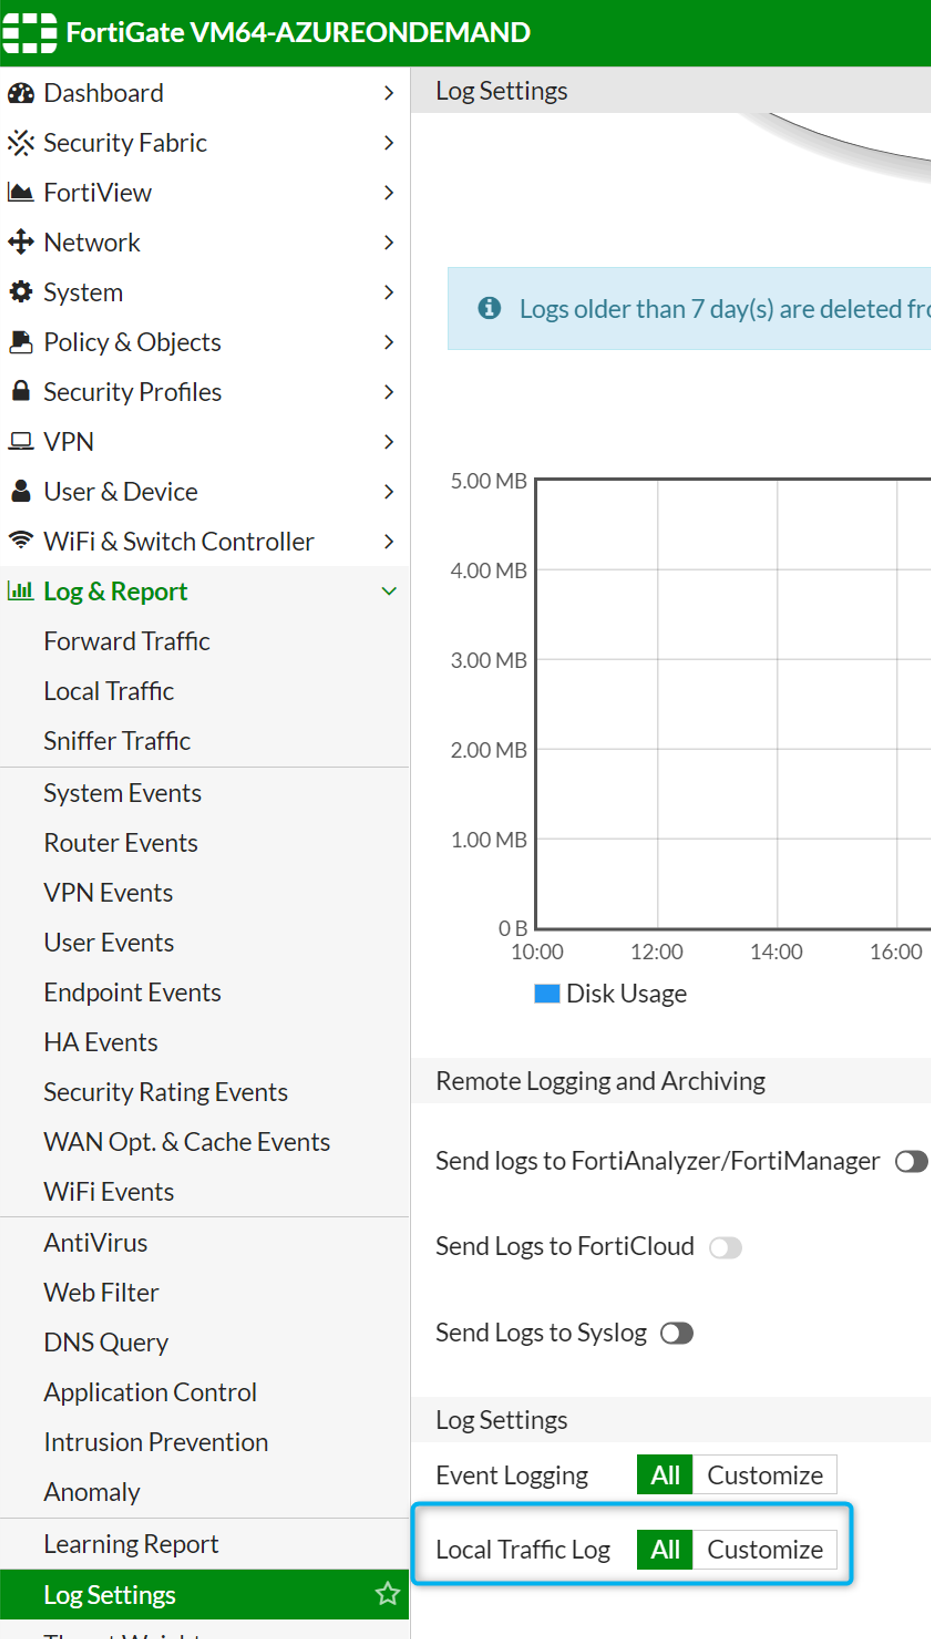
Logs for Local Traffic
To check that Health Probes are getting to the Firewall itself, we must enable proper logging for Local Traffic.
Go to Log & Report -> Log Settings
Change Local Traffic Log to “All”
Now you can go to Log & Report -> Local Traffic
Click on “Add Filter”, select Destination, and put Azure LB HealthCheck IP 168.63.129.16
